Intermediate Tutorial: Placing a Quest Stage Event
To prepare to place an event, choose Event Mode, either by the Mode option on the top menu or by choosing the "E".
- To place the Quest Stage event, click on the square you wish to hold the event. This will open the Event Editor. The event slot for the chosen square will be highlighted.
- From the Event Type dropdown menu, choose Quest Stage.
- Click "Add" to open the event dialog.
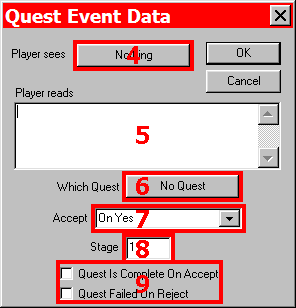
- To select an image to go with the Quest Stage event, select this button. This type of event may use small pictures.
- This box is where the message would go. The Quest Stage event is set up to ask Yes/No questions, but does not require them.
- Press this button to open a dialog containing the names of all of the Special Items, Keys and Quests you have set up for the game. Obviously to use this event, you must first have created at least one Quest.
- The 'Accept' dropdown menu determines under what condition the quest stage will be given. The options are "Impossible", "On Yes", "On No", "On Yes or No", "Impossible (No Question)", "Automatic (No Question)". The "Yes" and "No" option will appear depending upon the choice made - the latter two do not display a set of buttons.
- To assign a new quest, the Quest Stage should be set to "1", any other number will cause the event not to fire. For purposes of advancing a quest, the Quest Stage should be one number higher than the expected current level.
For example:
If you want the party to find a golden chalice for the king, you would need to place a Quest Stage event with a Quest Stage of "1". Let's say that the next thing the party needs to do once they have the quest is to talk to a retired, aged knight who can send the party off in the right direction and you don't want the party to get any more clues until after they have talked to the ancient knight. You might accomplish this by having an event chain that starts with a Quest Stage event with Quest Stage set to "2", and the Chain Trigger to "If Event Happens" for all of the appropriate events. This would be the conversation with the old knight - it won't occur until the party accepts the quest, and once it has occurred changing the stage of the quest to "2", it won't happen again, as the Quest Stage event will look to your quest and see that it needs to have a "3" to fire the next time. - Checking either one of these options can end the quest. "Quest is Complete on Acceptance" allows for a finished quest which is important as an Event Trigger. Note that a question need not be asked, as you may select "Automatic (No Question)". The "Quest Failed on Reject" is important as Event Trigger. Note, as with the other option, a question need not be asked, select "Impossible (No Question)". These two options may both be checked to work together.
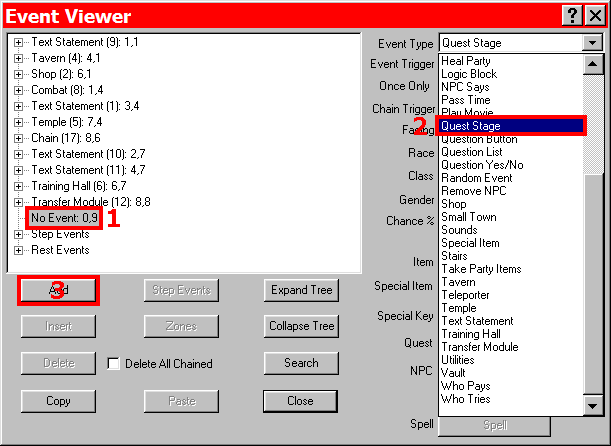
Choosing Quest Stage Event
Quest Stage Event
There is another way to manipulate quest stages - the Utilities event. While this event cannot assign a quest, it can change the quest stage value, which is why I've decided to include it here.
- To place the Utilities event, click on the square you wish to hold the event. This will open the Event Editor. The event slot for the chosen square will be highlighted.
- From the Event Type dropdown menu, choose Utilities.
- Click "Add" to open the event dialog.
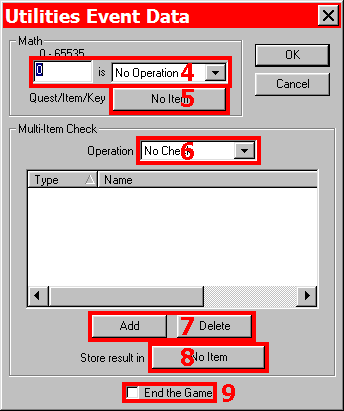
- As opposed to the Quest Stage event just covered which can only increment a quest one stage at a time, the Utilities event can add any value up to 65,535, set the quest stage to a specific amount, or subtract any value up to 65,535 to a quest. Not only can it perform these operations on a quest, but also on special items and keys. The first box is for the number, while the dropdown menu has the options "No Operation" which does nothing, "Store in" which can set the quest to a specific value, "Added to" which can add a given number of stages to an event, and "Subgtracted from" which can remove a given number of stages from a quest.
Note: there are two important numbers to remember when dealing with quests - 65,000 which when the quest stage means that a quest is complete, and 65,001 which when a quest stage means the quest has failed. (DC will treat any number of 65,002 to 65,535 as 65,001.) - This button is used to select the quest, special item or key that is to be used.
- A designer may want to check to see if a party has mutliple quests, special items and/or keys at a given point. This dropdown menu provides the options for doing this of "No Check" which means nothing will be checked, "All Items" which means that all of the quests, special items and/or keys selected in the next step will be checked for, and "At Least 1 Item" which means that if any one or more of the quests, special items and/or keys selected in the next step are present.
- These buttons are used to add and remove quests, special items and/or keys to be checked in this event.
- This button allows you to choose which quest, special item or key will have the results of this check stored in it. If the check results in all of the parameters being met, a "1" will be stored in the selected quest, else nothing will occur.
- If this box is checked, the game will end immediately after this event is fired.
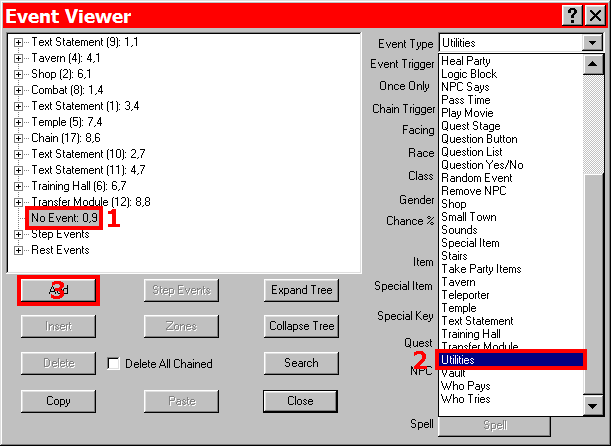
Choosing Utilities Event
Utilities Event