Basic Tutorial: Placing a Transfer Module Event
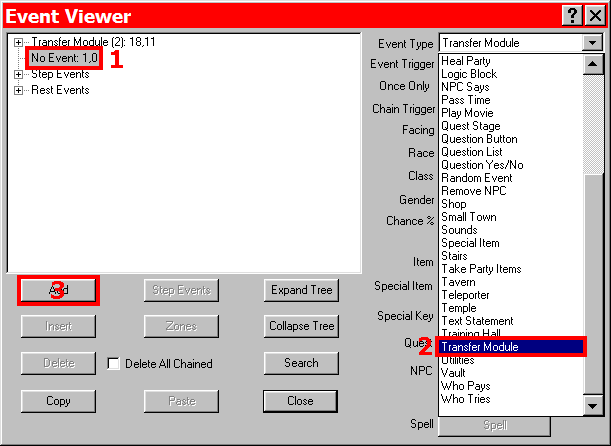
To prepare to place an event, choose Event Mode, either by the Mode option on the top menu or by choosing the "E".
- To place the Transfer Module event, click on the square you wish to hold the event. This will open the Event Editor. The event slot for the chosen square will be highlighted.
- From the Event Type dropdown menu, choose Transfer Module.
- Click "Add" to open the event dialog.
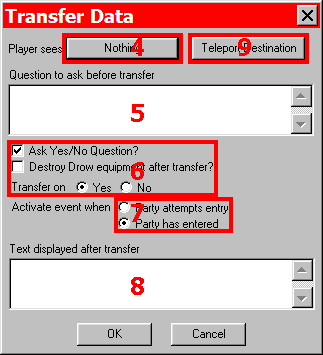
- To choose an image to go with this event, select it by pressing this button.
- Place a message or question here. The text in this box will be displayed each time the event is activated.
- These three options determine how the event will work. To have the message entered in the previous box be a question, check this first box for a Yes/No dialog. Checking the option allows you to choose wheter to transfer on "Yes" or "No". You may also wish to have any drow equipment the party is carrying destroyed when the transfer occurs.
- To determine whether the Transfer Module Event will occur when the party enters the square holding the event or when they attempt to enter that square, select the appropriate option.
- This text box is for entering any message you wish the party to see after they have transfered. This text will display each time the event is activated.
- Click this button to bring up the Teleport Destination dialog.
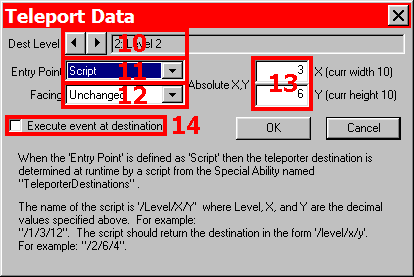
- Use the arrow keys to select the level you wish to have the party teleport to, the options are all active levels including the level you are currently working on.
- This dropdown menu gives the option of selecting one of the 8 entry points for the chosen level or specific coordinates. It also has an option called "Script" which allows a script in a Special Ability set the level and coordinates for this event.
- Choose one of the four cardinal directions with this dropdown menu, or choose "Unchanged" to have the party continue facing the direction they are currently facing when they arrive at their destination.
- If coordinates were selected instead of an entry point, these boxes would be active and they would be where you would enter the x and y coordinates for the chosen level. If Script is chosen, these boxes will also be active and an x and y value would be entered.
- If you would like to have event happen at the teleport destination, check this box.

Placing Transfer Module Event

Transfer Module Event

Teleport Desitnation Dialog
For using a script with this event, you must have created a Special Ability called "TeleporterDestinations". In that Special Ability you must have a Hook that matches the level and x,y coordinates set in the event and be in the format "/Level/X/Y". For example, as in the image above, if the event has a level set to '2', with an x coordinate of 3 and a y coordinate of 6, would be "/2/3/6". The name of the Hook must match the level and x,y coordinates or it will not be used for this event.
Note: TeleporterDestinations can have multiple Hooks so that you can use multiple different scripted Transfer Module (or Teleporter or Stairs) events at one time.
Back to Design Tutorials
Back to Designer's Guide Index