Tutorial Design Instructions
This is a tutorial that will take you step-by-step in creating a basic design in Dungeon Craft. It is a combination of all of the individual tutorials on the page, put together into one document to not only demonstrate how creation takes place but to provide an example workflow for beginning designers.
Getting Started
- Double-click the DungeonCraftEditor.exe icon/name to open the editor and select "New".
- For purposes of this tutorial, all options were left with default values in the Global Settings page, and the design name chosen is "Tutorial".
- The 10x10 square level will be perfect for this tutorial, in which there will be a small town and a goblin hideout. I also have determined that magic users in my design will have additional help in fighting goblins via a new spell.
Creating the goblin
For this design, I want to create a new goblin, one that is a little tougher than your normal, run-of-the-mill goblins; a goblin scout.
- To create a new monster, click on 'Database' on the upper menu, and from the drop-down menu, choose 'Add Monsters...' or by using 'CTRL+M' hotkey combination.

- Select 'Add' to open the Monster Properties window.
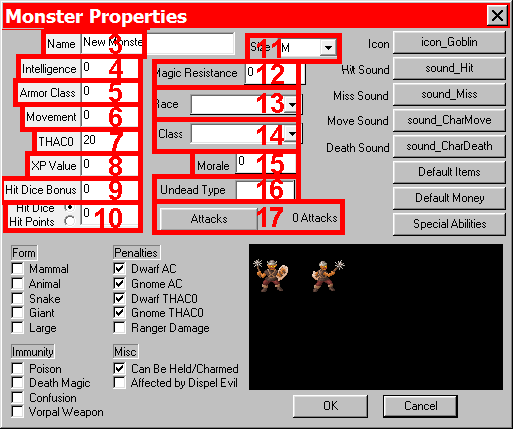
- The name of this new monster is 'Goblin Scout' and goes in this field.
- It is of average intelligence, which is on the smart side for goblins - a '10' is placed in this field.
- It has the worst possible Armor Class, '10' which may be modified later by giving armor to the Goblin Scout.
- The mosnter gets a good movement rate of '12' to represent it being a scout.
- THAC0 (To Hit Armor Class 0) is '20' to represent the relatively unskilled nature of this monster.
- I have decided that if this monster is defeated by the party that it is worth '50' XP (Experience Points) to them.
- The Goblin Scout has a bonus of '1' to represent it's elite (for a goblin) status.
- The Goblin Scout is a '1' hit dice monster - meaning it may have from 1 to 8 hit points, not counting the bonus.
- The size of the monster is 'M' (the default) as it is nearly human-sized.
- This monster is not resistant to magic, so I leave this value alone.
- Choose the race of the monster from the dropdown list. The goblin scout is of race, "Monster".
- Choose the class of the monster from the dropdown list. The goblin scout is of class, "Fighter".
- A morale score of '25' will be added to the Combat Events base score (0 to 50) to give a value in the 0 to 100 range which represents the morale for this monsters. At 0, they will turn and run away as soon as combat begins, at teh other end, a score of 100 means they will always stay and fight until death or victory.
- This monster is not undead, so I left this field alone.
- This button opens the Monster Attacks window.
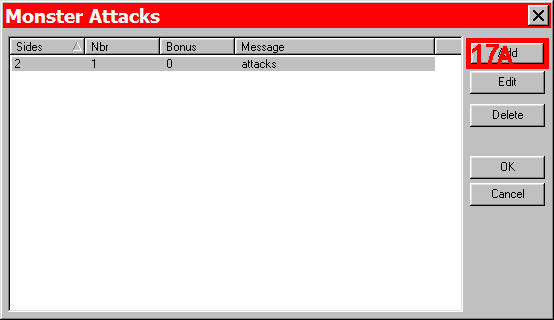
17a. Press the 'Add' button to open the Monster Attack Details window. As I only want the Goblin Scout to have one unarmed attack per round, I only do this once.
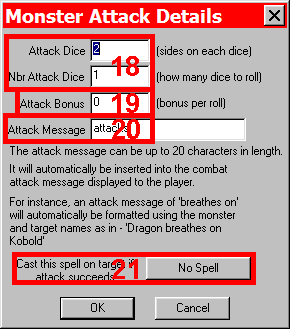
- Goblin Scouts, like all goblins are relatively weak, and there only do 1d2 hit points of damage with their unarmed attack.
- Goblin Scouts do not do any bonus damage, so this field is left alone.
- I decided to leave the defalt Attack Message in place, so that this attacks will display as "Goblin Scout attacks..."
- No spells are to be attached to the attack, so this option is left alone.
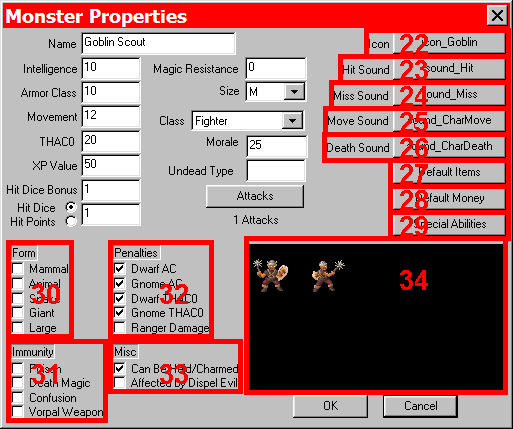
- This button selects the icon to be used for the monster - I selected it and navigated into my design's Resources folder and chose 'icon_Goblin.png'.
- I left this as 'DEFAULT' to let Dungeon Craft populate this with a sound.
- I left this as 'DEFAULT' to let Dungeon Craft populate this with a sound.
- I left this as 'DEFAULT' to let Dungeon Craft populate this with a sound.
- I left this as 'DEFAULT' to let Dungeon Craft populate this with a sound.
- I didn't give the Goblin Scout any items, so I left this button alone. I can always edit the Goblin Scout at a later time to give it the desired items.
- I decided Goblin Scouts didn't carry money of any sort, so I ignored this option.
- The Goblin Scout is a basic creature and does not have any Special Abilities.
- For their Form, I decided that Goblin Scouts are none of these.
- Goblin Scouts have no immunities, so all boxes were left unchecked.
- Goblin Scouts have the selected penalties, basically meaning that they are easier to hit for dwarves and gnomes, to of the monsters racial enemies.
- As Goblin Scouts can be Held and Charmed by spell, I selected this option. As I've now completed the Goblin Scout, I selected 'OK' until I was back to the base editor for Dungeon Craft and saved my work.
- While not selectable in and of itself, this is where the icon chosen in step 22 is displayed.
Creating the goblin knife
New goblins mean new weapons and new treasure. I will create a new weapon called a goblin knife. I might want to give this to goblins to use, or I might want to give it to the party as treasure. Since I am undecided, I will create the weapon now, but not assign to any monsters.
- To create a new item, click on 'Database' on the upper menu, and from the drop-down menu, choose 'Add Items...' or by using 'CTRL+I' hotkey combination.
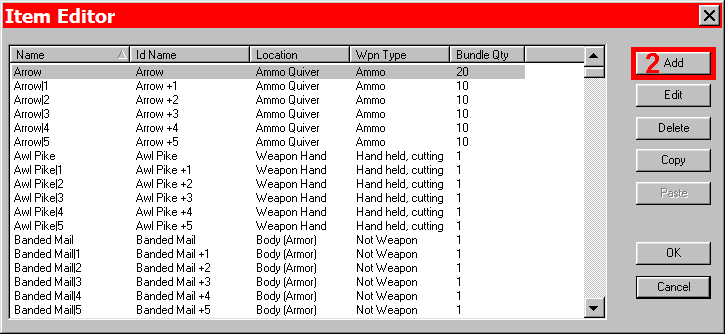
- Select 'Add' to open the Item Properties window.
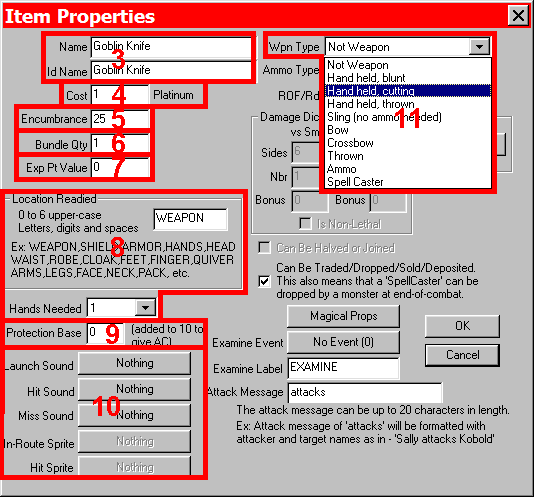
- I've decided to make a 'Goblin Knife' that will not have any special abilities or attributes. Type 'Goblin Knife' in the Name and ID Name fields.
- Goblin knives are low quality and therefore cheap - enter a '1' for cost.
- The encumbrance is the weight for the character - 10 equals one pound. The goblin knife weighs two and a half pounds, so enter '25'.
- Goblin knives can not be bundled together, enter a '1'.
- This item is not worth any Experience Points, enter a "0".
- The goblin knife is a weapon, so it is carried in the weapon hand and only requires one hand to use. Enter 'WEAPON' in the box.
- A goblin knife offers not protection, so enter a '0'.
- I do not want to associate any sounds or images with this item, so I leave these alone.
- From the weapon type drop-down menu, I choose the proper weapon type for the goblin knife - Hand held, cutting.
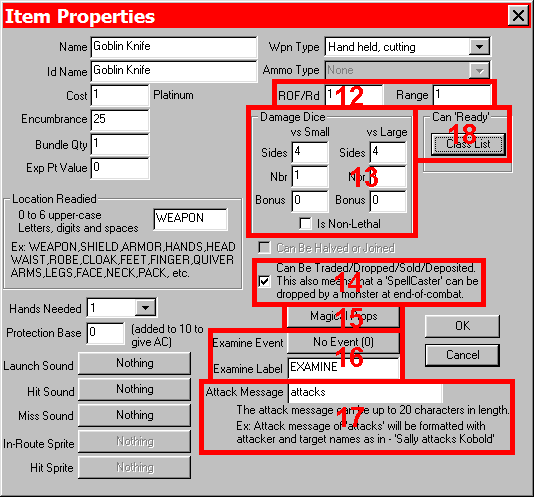
- Because I want the goblin knife to be used only once every round, the ROF/rnd (Rate of fire per round) is set to '1'. As the knife is a melee weapon, I set it '1' so that only adjacent combatants may be attacked.
- The damage done to each combatant is 1d4 (one four-sided dice) and entered as shown.
- I want the goblin knife to be able to be found by the party after the combat, and subsequently traded between members or sold in a shop, so the box is checked.
- This item has not Magical Properties, since I did not use this button.
- I do not want the player to be able to 'Examine' the item so I did not use this feature.
- I chose not to have a special attack message so left this as the default 'attacks'.
- This is the button for selecting which classes may use this item (see below).
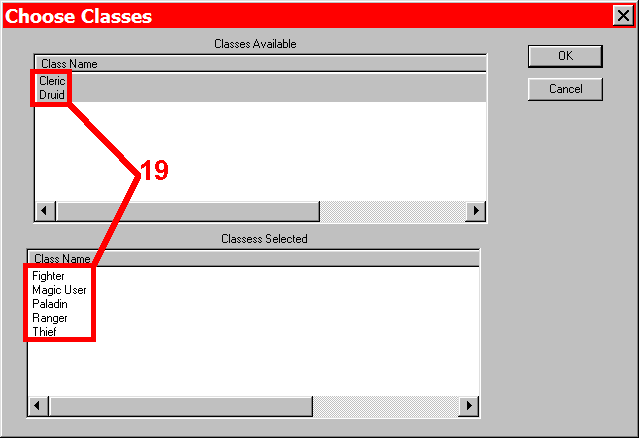
- I've decided that clerics and druids can not use the goblin knife, but that all other classes may.
- All that is left to do is to select 'OK' 3 times to get back to the main editor and save your work.
Creating the highlight spell
Because I have made a new monster that is a little tougher than the goblins that players may be used to, I have decided that the party's magic user should be able to provide a little more help in fighting these monsters. That is accomplished by creating a spell to highlight enemies in combat.
- To create a new spell, click on 'Database' on the upper menu, and from the drop-down menu, choose 'Add Spells...' or by using 'CTRL+S' hotkey combination.
Adding a Spell
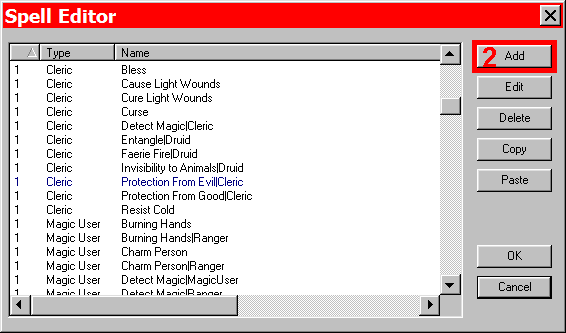
- Select 'Add' to open the Spell Properties window.
Spell Properties
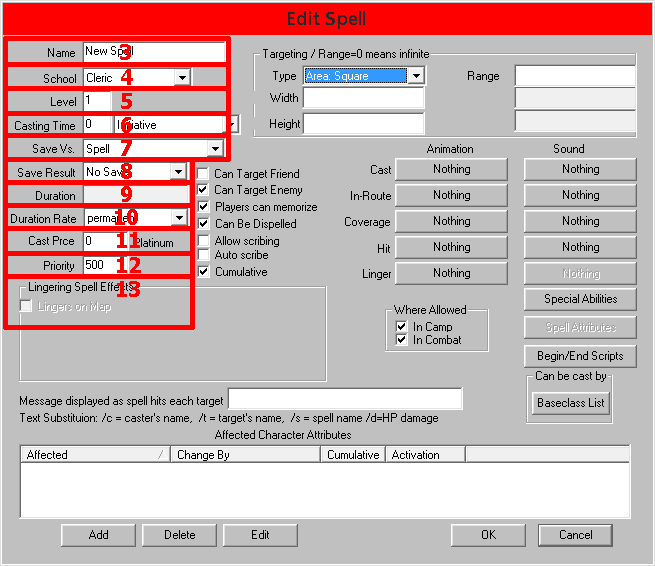
- The name of this new spell is 'Highlight', the idea being that the target is "highlighted" magically and easier to hit, shown below.
- This spell is for magic users. By default Cleric is listed, to change select the arrow for the dropdown menu
- It is a first level spell.
- I left these at the default, which basically means the spellcaster gets to cast it as quickly as it's turn comes up.
- I left the Saving Throw type as 'Spell', even though no save is allowed.
- Regardless of the roll made by the engine, no save is allowed.
- The duration of this spell is equal to the level of the caster. This is indicated by placing the variable 'level' in the box. Also accepted are integers and simple equations with integers and the vairable 'level'.
- The duration is measured in rounds.
- There is no fee to cast this spell.
- By default, this spell has a priority of 500. This has no effect when the PC uses teh spell and is only used by the AI to determine which spells to use first.
- If a spell has lingering effects, such as continuing damage and continuing displayed graphics, you would shoose this option.
Spell Properties
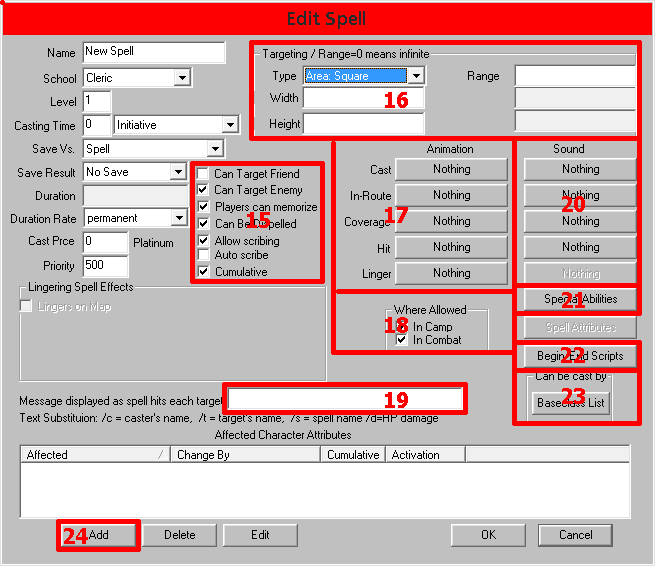
- This spell can only be used against enemy combatants. This is where it is also decided that the PC can learn and use this spell.
- Targeting for this spell is straight-forward: one target may be chosen (select 'Selected by Count' from dropdown), and they may be up to twice the level of spellcaster distance away - in range place'2*level'.
- For now I have opted not to associate any graphics with this spell. It is possible to come back and add graphics at any time (by use of the 'Edit' button on the initial screen). There are many spell graphics provided in the design's Resources folder and you can add your won as well.
- This spell can only be used in combat.
- This is where you would enter any message associated with casting, such as '/c highlights /t', where /c is a variable for the caster's name and /t is a variable for the target's name.
- I have opted not to associate any sounds with this spell at this time, but may come back in the future and add sounds. Just like the graphics, there are sournds in the Resources folder or you may add your own. Common formats sush as WAV, MP3 and MIDI can be used along with less common ones as well (MP1, MP2, MO3, MOD, MTM, XM, IT, and S3M).
- I did not add any Special Abilities to this spell, but if I did, I wouold be able to list as many per this spell as desired with a predefined parameter for each if desired.
- No scripts were added to this spell. This button opens the script editor to add Begin and End scripts, which as their names imply occur when the spell begins and ends, respectively. See the advanced spells tutorial fo more information.
- Press this button to determine which baseclasses have access to this spell.
- Here is where I've chosen what attribute is actually affected by the spell, via the 'Add' button.
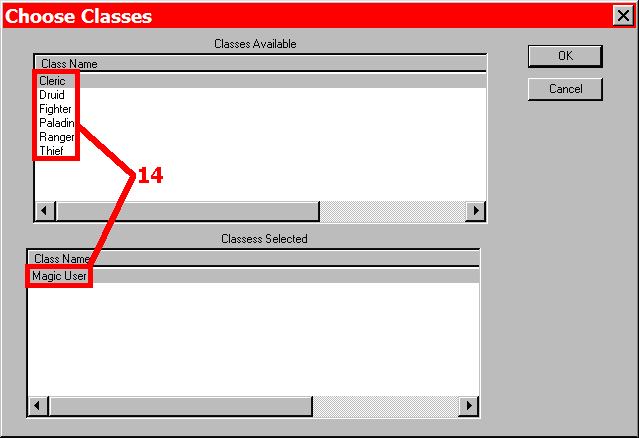
Choosing a Class
- (from step 23 above - sorry for the out of order numbering at this time) I have selected that only the magic user baseclass has access to this spell.
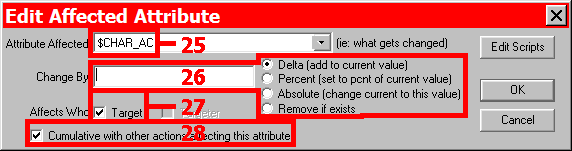
Editing an Affected Attribute
- I have chosen to affect the target's AC (Armor Class).
- I am changing the AC by 4, which because of the way AC works means the target is now easier to hit.
- This spell attribute will affect the target.
- I've decided this spell is cumulative with others that may affect a combatant's AC.
- Press "OK" until you have gotten back to the main DC editor. Save your design.
Creating a room and hallway
Now that we have augmented our databases, it's time to begin designing the adventure. We'll get right to work with adding a room, a hallway leading to it, and a Text Statement event to provide some atmosphere.
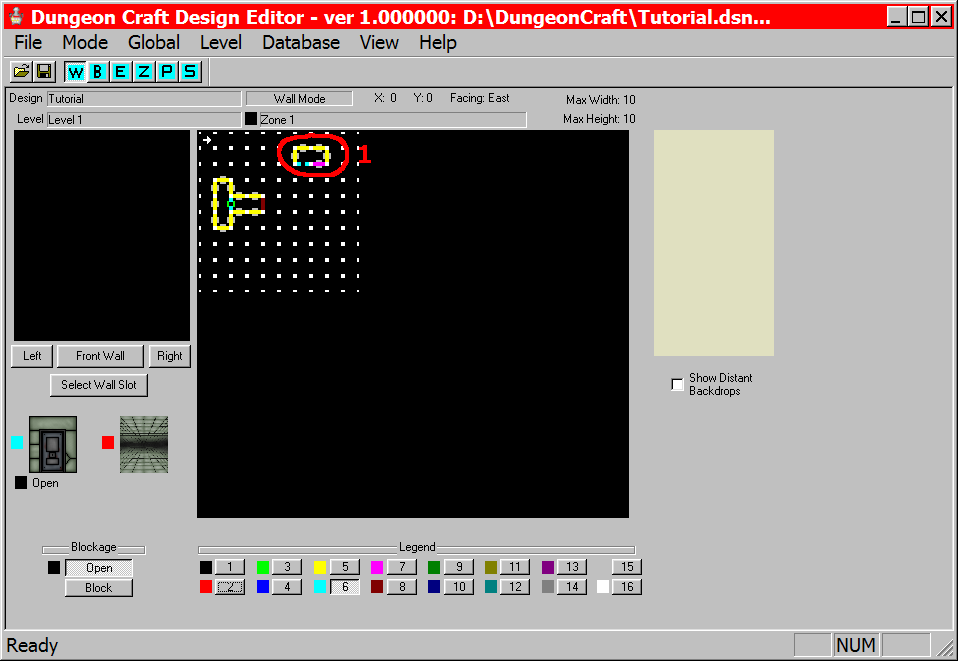
- Select "W" from the top menu (or use the Mode from the top menu and choose "wall mode)
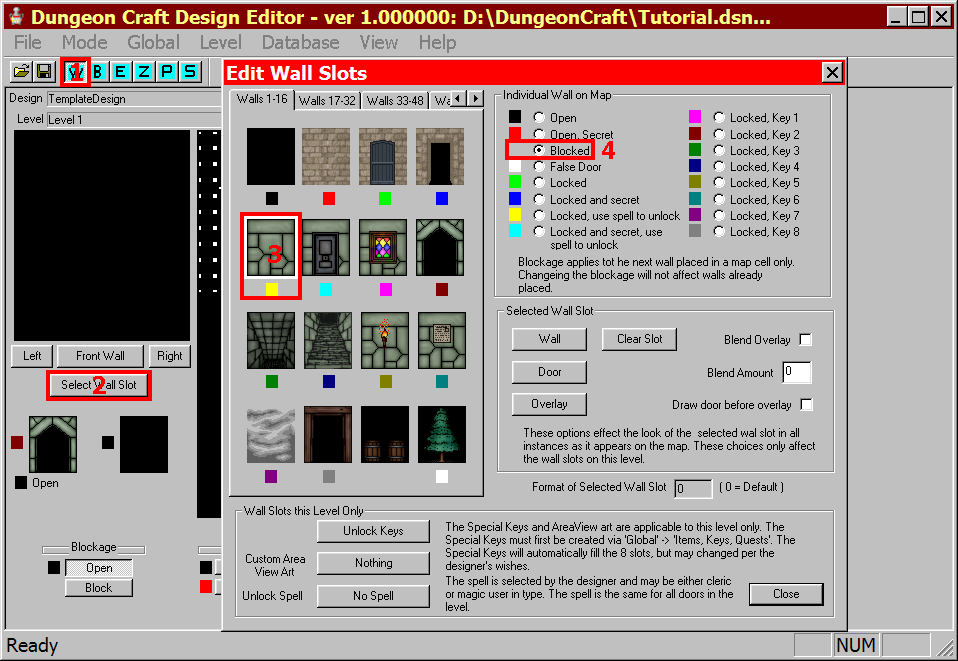
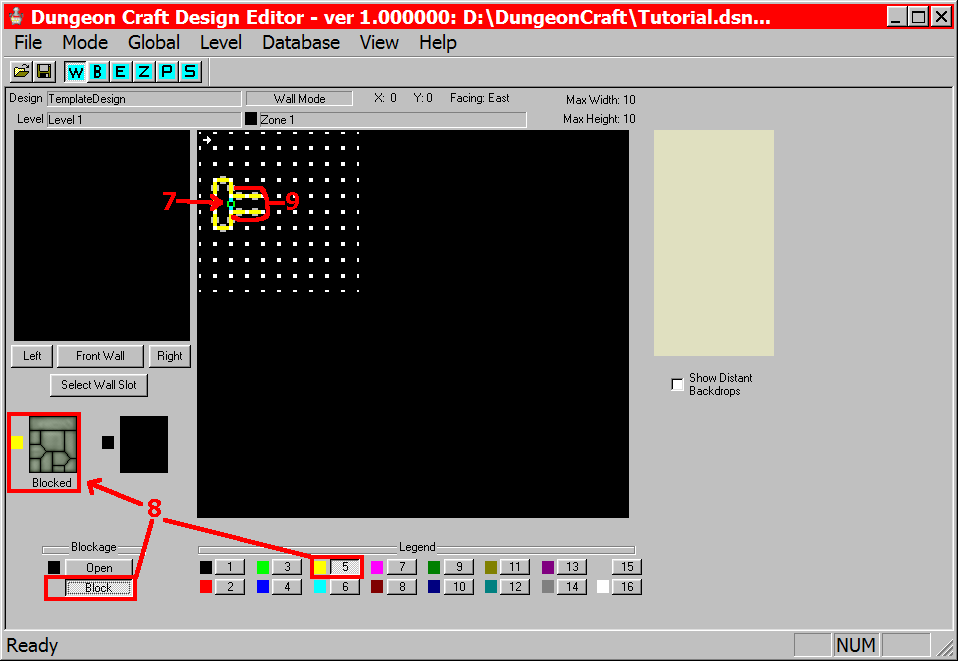
- Click on the select a wall slot button. Normally we will choose from the listing on the bottom of the editor, but to better see what are wall options are, we choose this option.
- Select the wall for the room - the one we want is in grey brick wall in the fifth slot.
- So that the party can not just walk through the walls, we want to set the blockage to "Blocked".
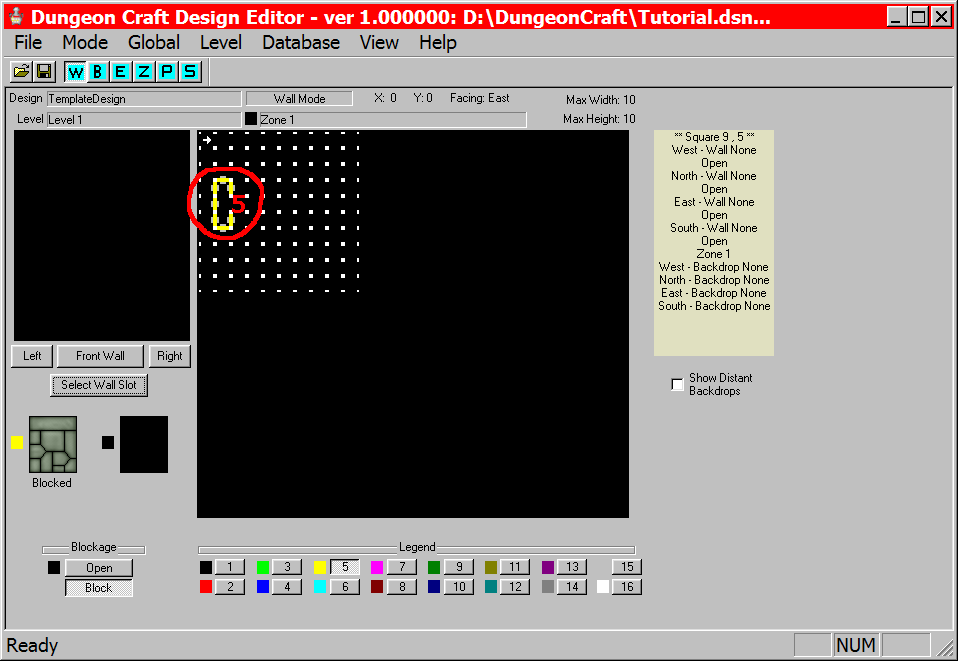
- Place the walls as shown to create a room.
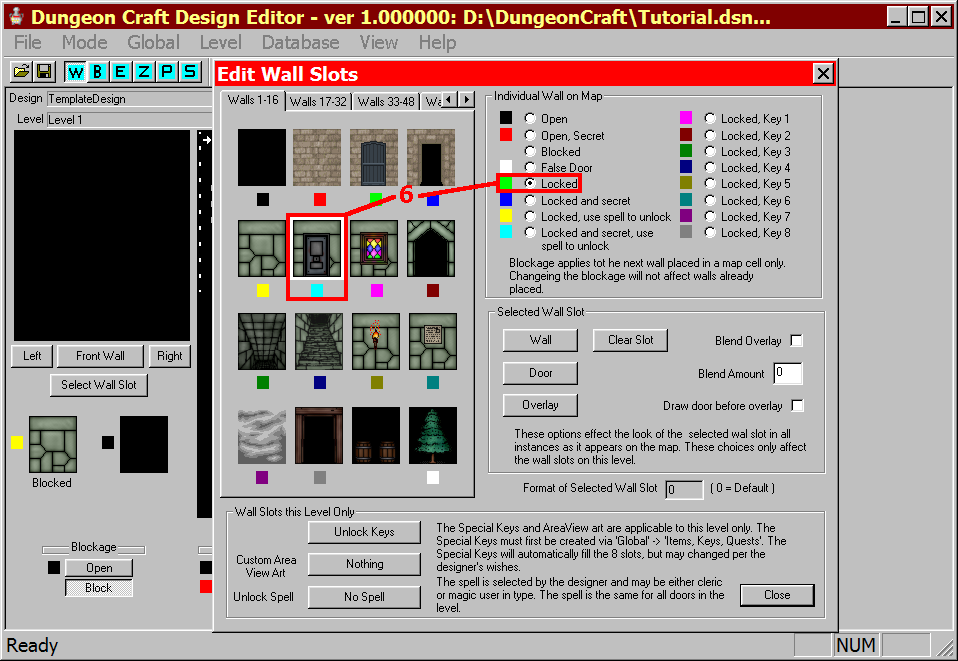
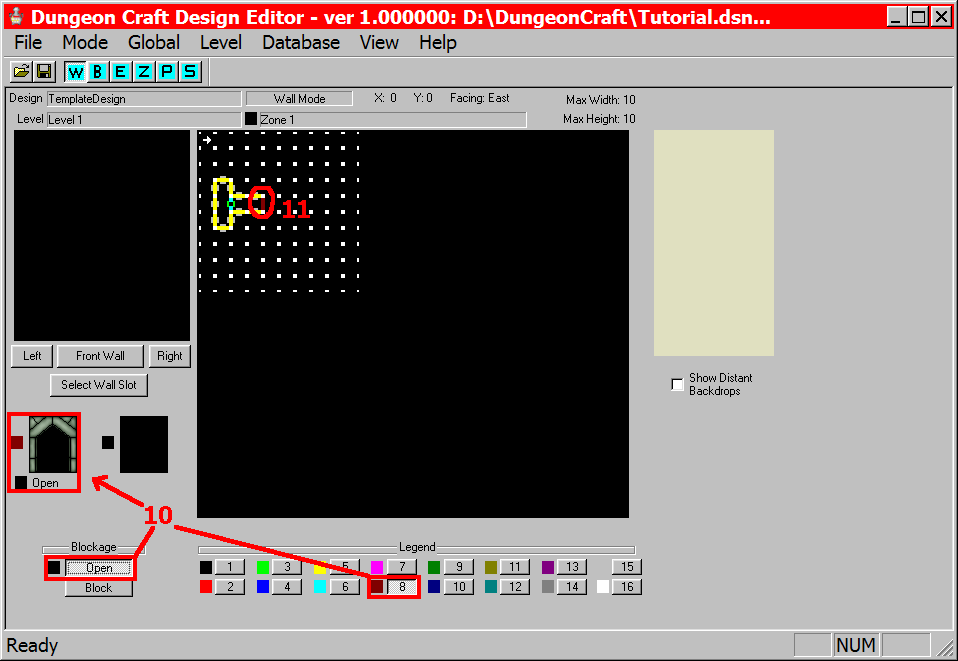
- Open the wall selection dialog again so that we can select a locked door (all blockages except open and blocked must be chosen in the wall selection dialog)
- Place the locked door in the empty slot we had left in our room.
- For the hallway walls, select the grey brick wall again and choose the 'Blocked' blockage setting. Note that there is a preview that shows you which wall you have chosen and what it's blockage is.
- Place the walls as such to create a hallway.
- At the entrance to our hallway, I have chosen an archway for aesthetic purposes. The blockage needs to be set to open so that the party can walk through it.
- Place the arch as shown.
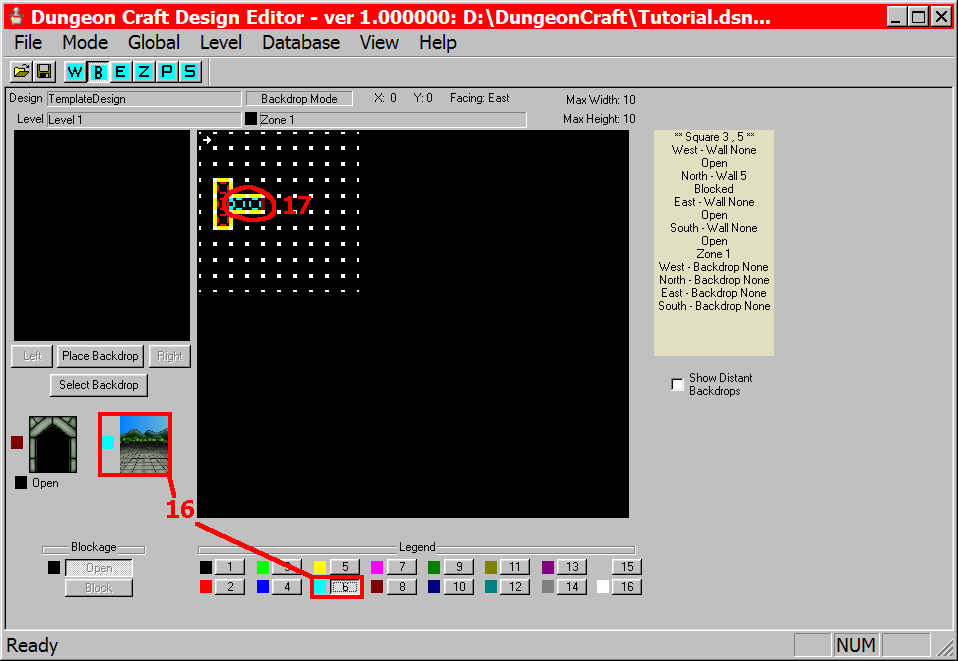
- It's time to place the backdrops, and Backdrop mode is chosen by using the "B" in the top menu (or by selecting the Mode menu and the background mode option)
- Press the Select Backdrop button so that we can see what our options are
- Choose the backdrop with the grey brick floor and ceiling.
- Place the backdrop in the three squares of the room.
- Select an outdoor backdrop.
- Place the outdoor backdrop in the hallway created earlier.
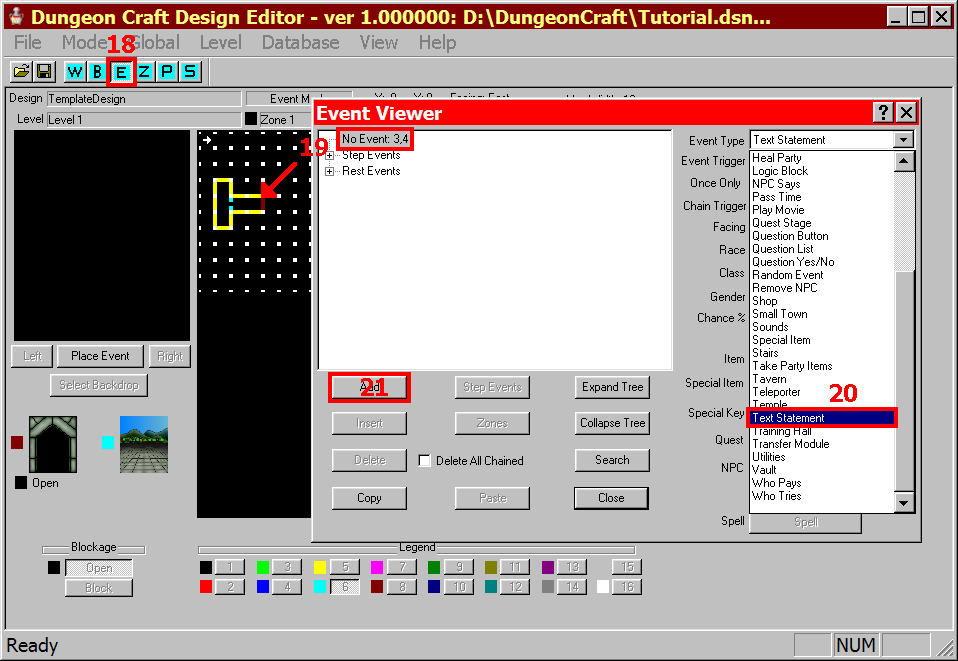
- To place an event, we must get into Event mode, by choosing "E" at the top (or using the Mode menu and choosing event mode)
- Select the square the event will occur in, the mouth of the hallway in our case. When the editor dialog opens up, the line representing the chosen square will be highlighted.
- From the Event Type menu, scroll down and select Text Statement.
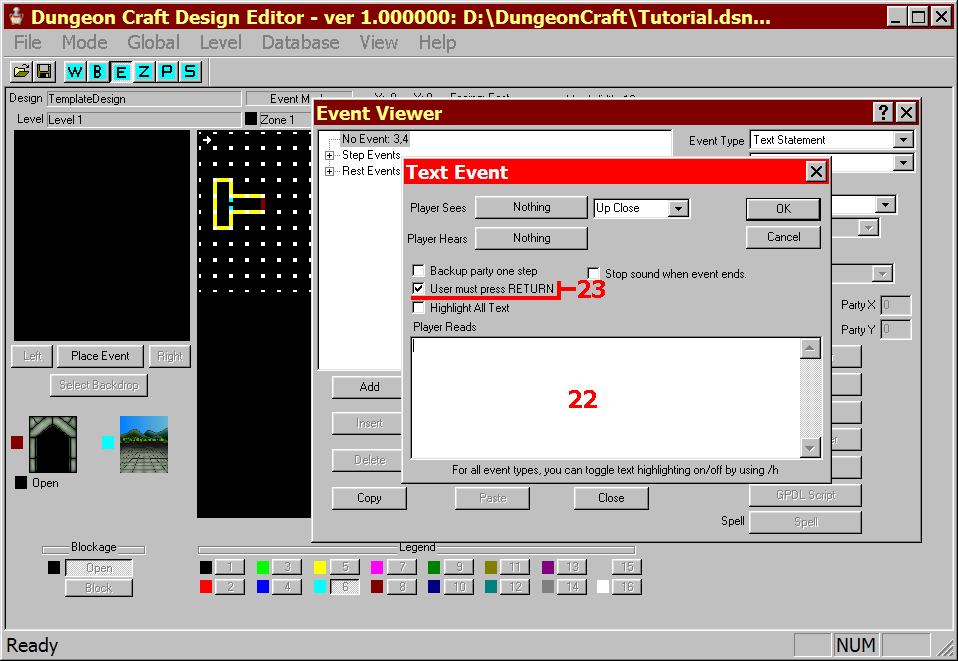
- Click 'Add' to open the Text Statement dialog.
- Add some mood text here.
- Because we want to make sure the player reads the message, leave the 'User must press RETURN' box checked. When ready, click OK and Close.
Selecting a Wall
Placing the Wall
Selecting the Door
Placing the Door and Walls
Selecting and Placing the Arch
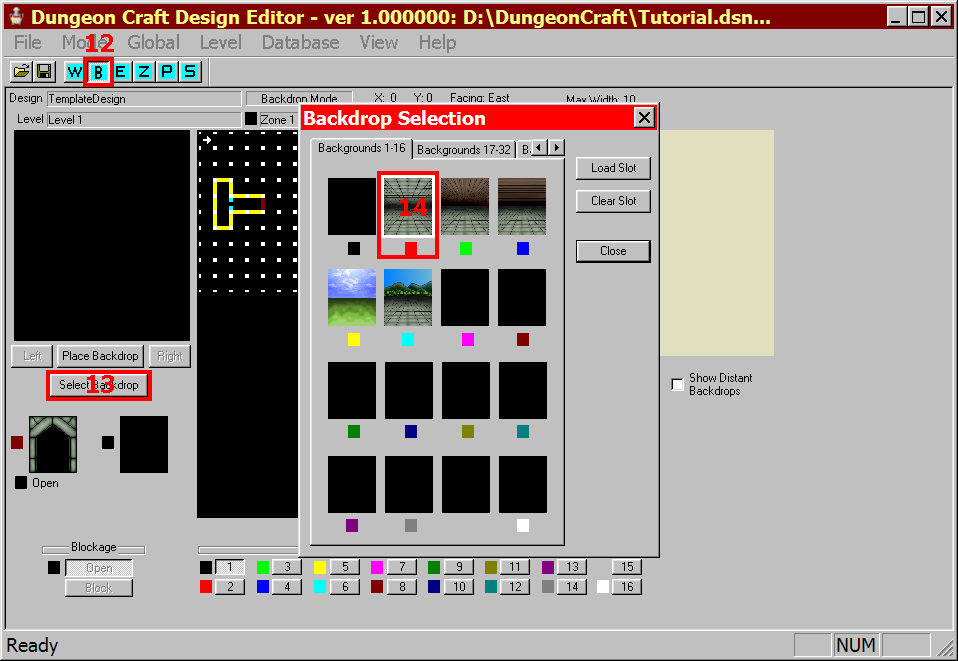
Selecting a Backdrop
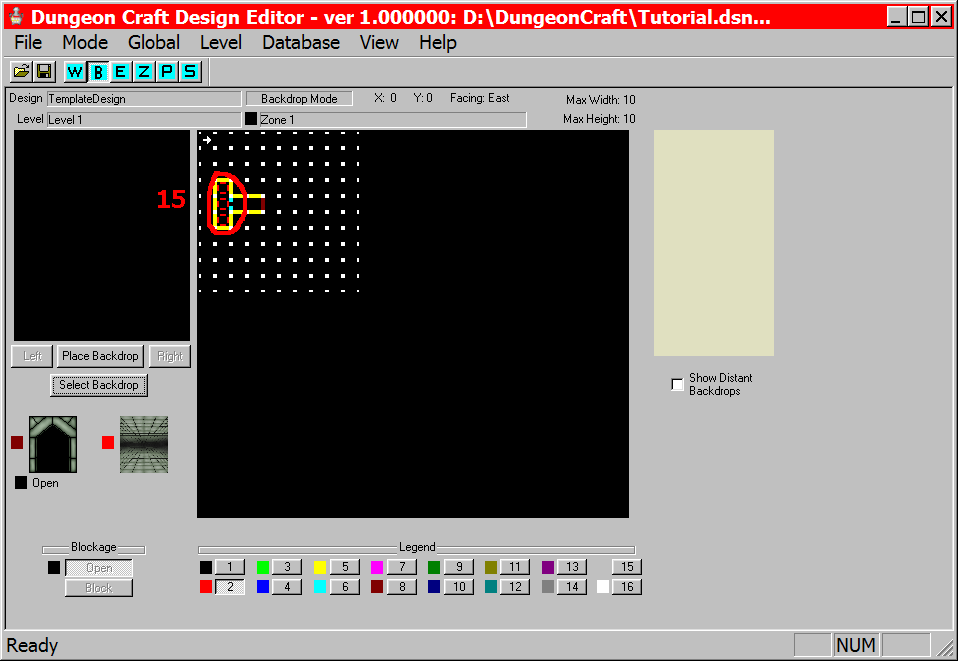
Placing the Backdrop
Selecting and Placing the Outdoor Backdrop
Placing a Text Statement Event
Text Statement Dialog
Creating a shop
One thing adventuring parties need is a shop to buy and sell goods at. Since this is a small town, we'll create a shop that covers all the party's needs, as there is only one shop in town.
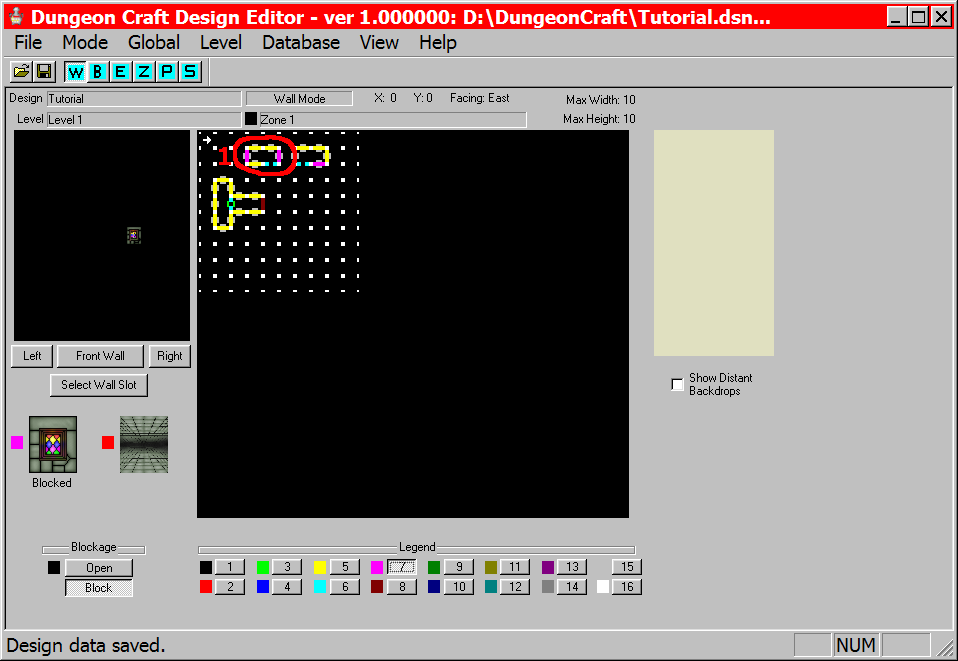
- Place the walls and backdrops for the Shop as shown. Note that I added a grey brick wall with a stained glass image to this building.
- Click on the square behind the door (in Event mode) to place the event.
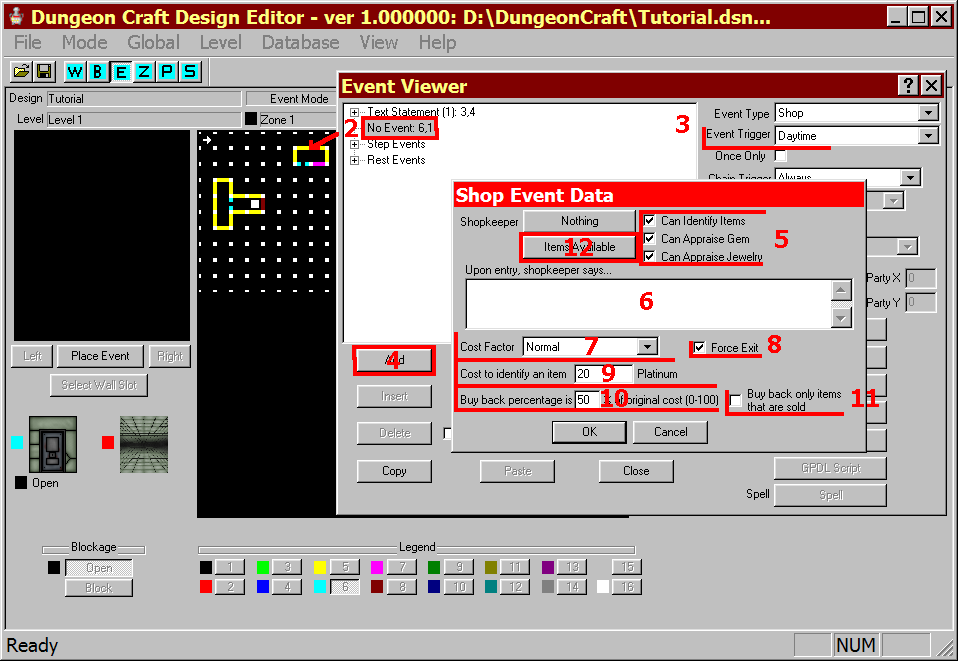
- I chose Shop from the Event Type list, and note that I changed the Event Trigger from 'Always' to 'Daytime' because I want the shop to reflect that in a small town you can often only use stores during the daylight hours.
- Click on 'Add' to bring up the Shop dialog.
- Because I want this shop to be able to do everything for the small town, I left all three options checked - Identify Items, Appraise Gems, and Appraise Jewelry.
- In the message box, type any greeting or other message you want the shopkeep to say to the party when they come ine. Remember that they will see this every time they enter the shop.
- Leave the cost factor set to "Normal"
- Because we want the party to leave the shop when they are done buying or selling, leave Force Exit checked.
- Since 20 platinums seems a fair price to me, I left that as the price Identify Items.
- I left the buyback percentage at 50% since I want the player to be able to get some money for selling items to the shop, but want them to pay attention to the cost of what they are buying as well.
- Since this is the only shop in town, I want the shop to buy items from the party whether or not they sell them.
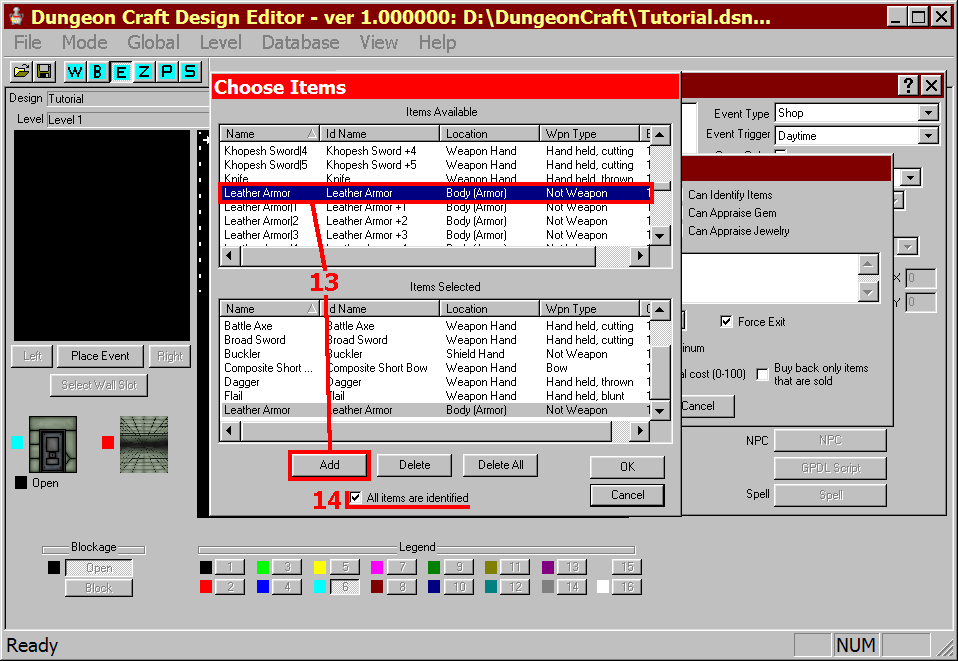
- This is very important - click the Items Available button to determine what the store sells.
- I've selected a mix of basic items an adventuring party might need, making sure to have something for each class. Select an item, and click "Add", or double-click the item in the top menu to add it to the store inventory.
- Since it is a store, I want the party to know exactly what they are buying, so I've elected to have all items identified.
- Click "OK", "OK" and "Close".
Shop Walls and Backdrops
Placing the Shop Event
Choosing Items
Creating a Tavern
Taverns, pubs and bars are staples of fantasy adventuring. It's a place for the party kick back and relax, maybe listen to a little gossip, have a drink, and maybe even pick a fight. We'll create a tavern for our small town.
- Place the walls and backdrops for the Tavern event as shown. Note that I am again using the stained glass windows in a building.
- Click on the square behind the door (in Event mode) to place the event.
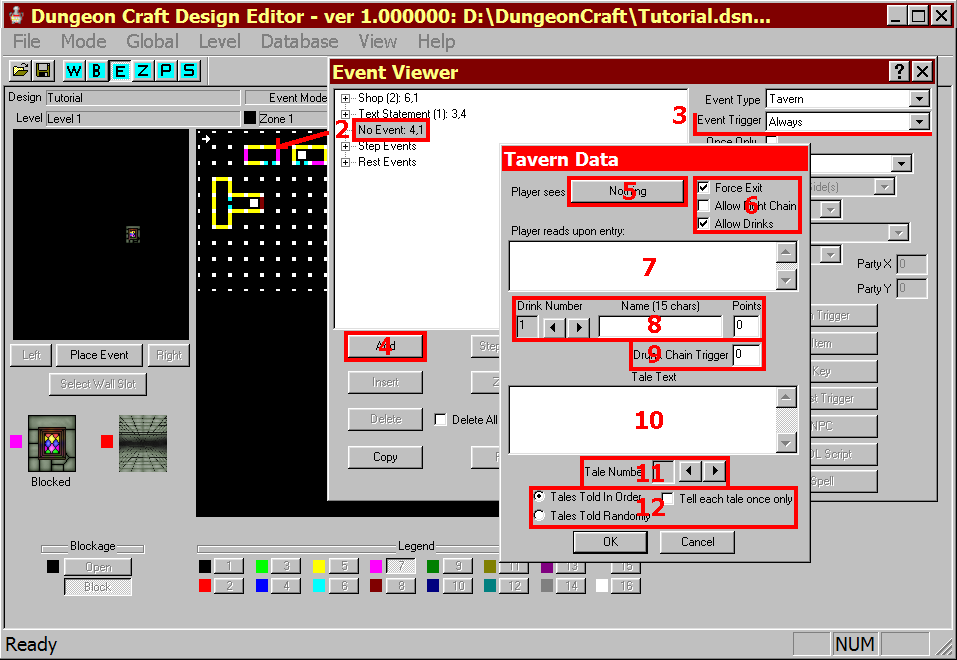
- I chose Tavern from the Event Type list, and note that I left the Event Trigger as 'Always' since the tavern in this small town is always open.
- Click on 'Add' to bring up the Tavern dialog.
- I use the Player Sees button to set a small pic for the party to see whenever they come into the bar, in this case the "portrait_NPC_HumanFemale.png" found in the Resources folder.
- Because I don't want the party loitering in the tavern when the event is over, I leave the 'Force Exit' box checked. I've decided that the Small Town is a nice place, so I uncheck the 'Allow Fight Chain', but part of the appeal of a tavern is it's drinks so I check the 'Allow Drinks' box.
- Enter an appropriate greeting in this box for the party to read each time they enter into the tavern.
- Enter the name of your first drink, and use the arrows to move to the next drink and enter another name, repeating to add up to 5 drinks. I've decided that the tavern will offer 'Water', 'Ale' and 'Wine'. I left the points at 0 for all since I've decided that nothing will happen after a certain number of drinks have been made.
- If you wanted something to happen after the party has had a certain amount to drink, determined by reaching a number of points, you would set that value here and have the option in the Event editor to add an event to represent the consequence. I left this as 0 (no chain) because I don't want anything to happen.
- This text box is for entering Tavern Tales - things the party will hear if they choose the 'Listen' option from the tavern menu. Enter something mundane as your first Tavern Tale - I wrote, "This small town sure is a quiet place."
- Use the arrow keys to advance to the next Tavern Tale, of which you may have up to 20. Advance to '2' and go back to the text box above and enter another comment about life in the small town. Advance to '3' and this time in the text box enter a vague comment along the lines of, "So-and-so claims he saw some goblins lurking around the edge of town." We're setting up for a combat between the party and the goblins we created earlier in the tutorial.
- I want the Tavern Tales to be told in order, so that the party has to listen to the boring tidbits of gossip before getting something that will potentially lead to adventure. I also decided that if the party wishes to keep listening, they will hear the same 3 Tavern Tales over and over.
- Click "OK" and "Close".
Tavern Walls and Backdrops
Placing the Tavern Event
Creating a Temple
Adventurers who face combat often suffer a few wounds. The temple offers a refuge for weary adventurers, a place to heal their wounds...for the right price.
- Place the walls and backdrops for the Temple event as shown. Note that I chose to use the tan brick walls to set the temple apart from the other buildings based upon its looks.
- Click on the square behind the door (in Event mode) to place the event.
- I chose Temple from the Event Type list, and note that I left the Event Trigger as 'Always' since the temple in this small town is always open.
- Click on 'Add' to bring up the Tavern dialog.
- To select an image that represents the temple or priest/priestess, choose a small pic. I chose the portrait_NPC_ElfFemale.png small pic found in the Resources folder.
- This text box contains a message that will be displayed every time the party enters the temple building. I chose this text to display information about the temple.
- The second text box is for an additional message that will also be displayed every time the party enters the temple. I used this text box to contain a cordial greeting from the priestess.
- This dropdown menu allows you to select the highest level of spell that may be cast by the priest/priestess of the temple. Values are from 1 to 9. Note, the highest level of cleric spells is 7. I left the value set to the default which is 7.
- This button allows the selection of spells that may be cast at the temple. While traditionally healing and curative spells are chosen, all spells, regardless of class, are available. Note, the "Fix" option is not set with this button, but in the Global Settings editor. I selected only cleric spells with the words "cure" or "heal" in the title. You may wish to add spells such as Raise Dead and Resurrection to your temple. Note: There are druid, paladin and ranger spells that are the 'type' Cleric, but all such spells have the name of the class in their title if the spell is in any way different from the cleric (the class) spell of the same name.
- This dropdown menu determines the cost of each spell per casting in the temple. Costs for each spell are set in the Spell Editor. Normal is the default choice, by anything from free to multiply by 100 may be chosen. Because the people in the Small Town are so generous, I decided that the cost for healing would be set at "div 100" - the standard price divided by 100. Not quite free, but almost.
- If 'Allow Donations' is checked, the party may give money to the temple in the form of a donation. If 'Force Exit' is checked, the party will be forced to leave the building when the temple event is exited. I left both of these checked because I want the party be forced from the building when they are done, and because at some future point I may want to add an event for donations.
- If donations are allowed, the designer may wish to give a reward or have some other effect occur when a certain amount of money has been donated. If so, then this is the box to check, and in the Event Editor there will be a donation chain which you may place any event such as Give Treasure or Text Statement. Since I am not doing anything with this now, I left the value at 0.
- Click "OK" and "Close".
Temple Walls and Backdrops

Placing the Temple Event
Creating a Training Hall
When the party members earn enough experience to advance in level, they need some place to do it, and in DC, that place is the Training Hall.
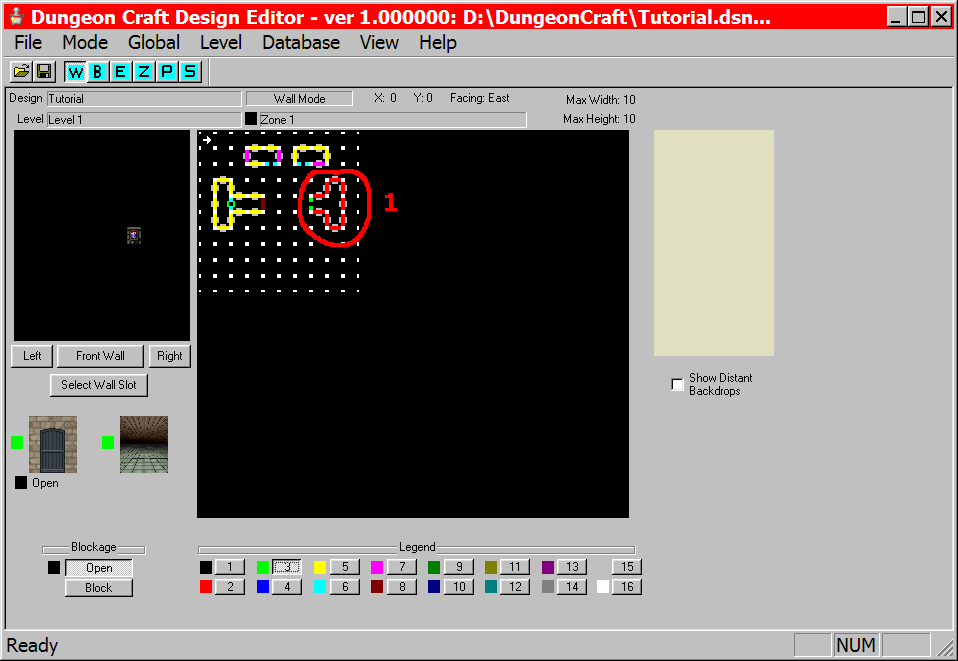
- Place the walls and backdrops for the Temple event as shown. Note that I chose to use the tan brick walls to set the temple apart from the other buildings based upon its looks.
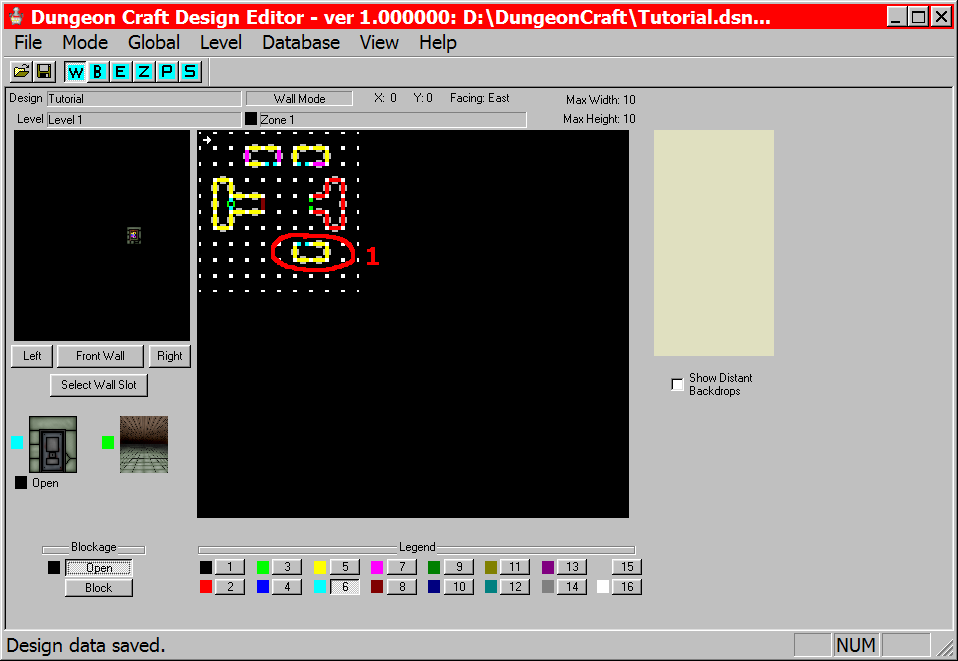
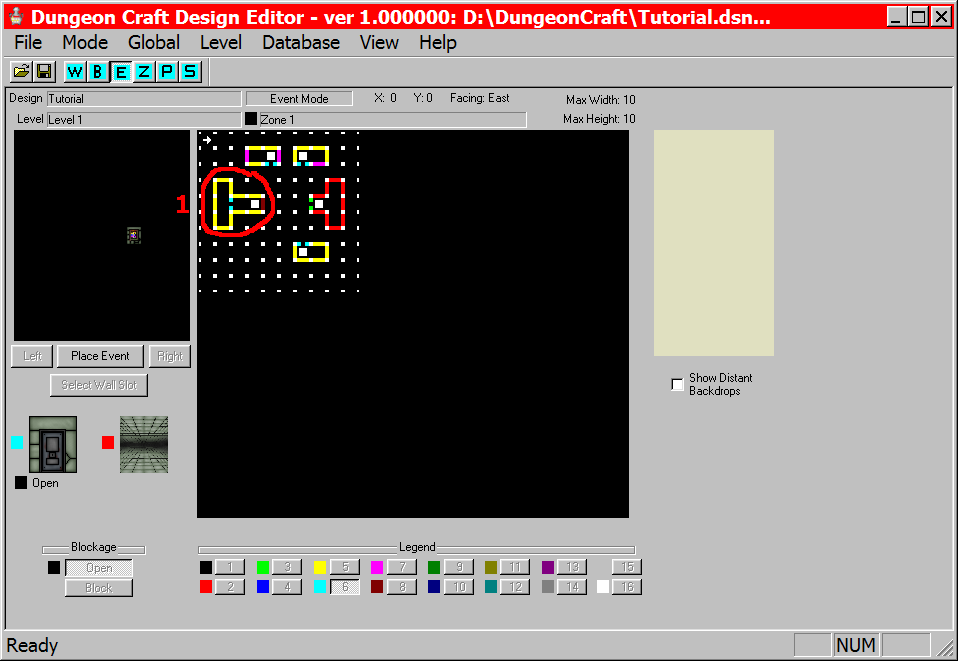
- Click on the square behind the door (in Event mode) to place the event.
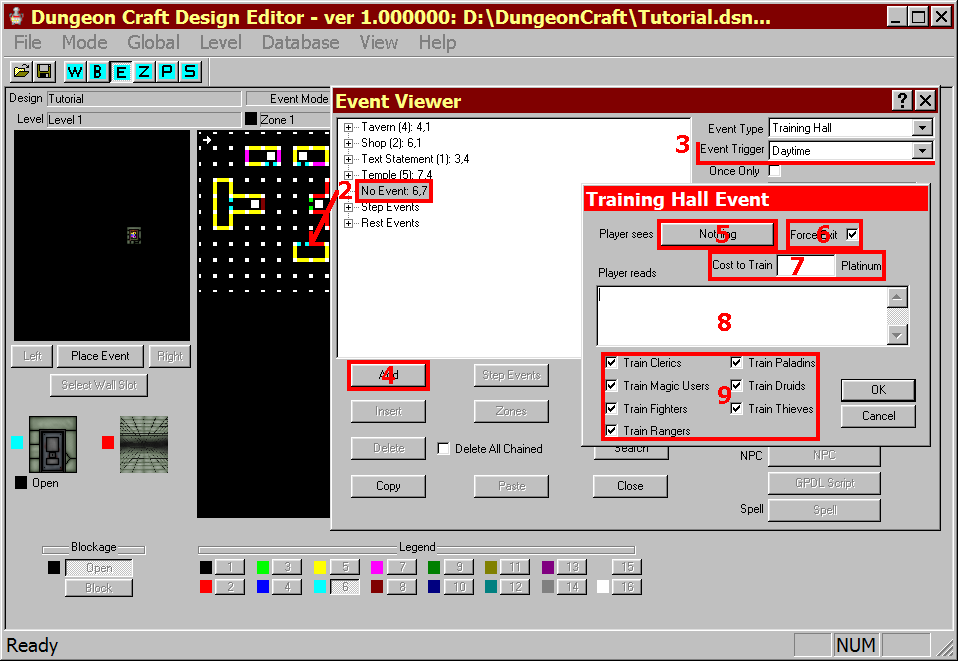
- I chose Training Hall from the Event Type list, and note that I set the Event Trigger to 'Daytime' since this is a small town, the training hall is only open during the day.
- Click on 'Add' to bring up the Training Hall dialog.
- To select an image that represents the training hall or trainer, choose a small pic. I chose the portrait_NPC_HumanMale.png small pic found in the Resources folder.
- Force Exit controls whether or not the party will be allowed to stay in the building when the tavern event is done; by default it is not checked. Because I want the party to be forced out when they are done, I checked the box.
- Set the price for training in this box. This amount is by default set to 2000 Platinum pieces. For free training, set the the price to 0. I want the price to be low, but not free so I set it at 10.
- This is the message the player sees every time the party enters the training hall. I entered a cordial greeting.
- These checkboxes control which classes can be trained in this training hall. You can have multiple training halls, each serving a subset of the classes to represent different guilds or schools of training. Because this will be the only training hall in the town, I left all classes checked so that all may train here.
- Click "OK" and "Close".
Training Hall Walls and Backdrops
Placing the Training Hall Event
Creating a Combat
Now that we have the basics of the small town, let us place a combat event.
- For the combat, I'm going to use the room we created at the beginning of this tutorial.
- Click on the square behind the door (in Event mode) to place the event.
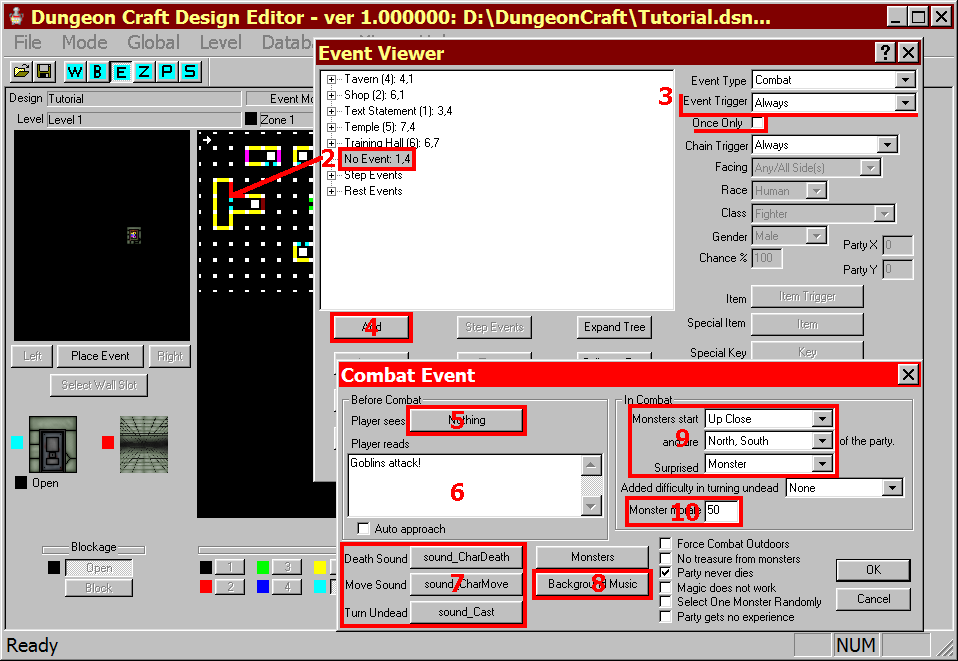
- I chose Combat from the Event Type list, and note that I left the Event Trigger set to 'Always' since you never know when the goblins are about. Note that I did not set this event to happen only once - every time the party comes here new goblins will be ready to fight.
- Click on 'Add' to bring up the Combat dialog.
- To select an image to represent the monsters or the battlegrounds, press this button to open the dialog to choose a small pic. I chose smallpic_Goblin.png from the Resources folder.
- Type a message that you want the players to see as combat begins. I chose something obvious.
- These three buttons determine which sounds will play for party members Death, Move and Turn Undead, respectively. I decided to leave the default sounds.
- This button allows the designer to select music to be played while the combat takes place. I opted to not use music during this combat
- These three options determine how the combat begins. Monsters may start 'Up Close' - right next to the party, 'Near By' - a middle distance close enough party members should be able to reach in one round, and 'Far Away' - the long distance which takes party members two turns to reach. I chose to have the monsters up close and personal and to either side of the party based on the shape of the building where the battle is occurring, in this case to the North and South. I also chose to have the monsters be surprised as there are no windows on the building and they couldn't see the party approaching.
- This number determines this combats 'Morale'. Morale is a number from 0 to 100. Up to 50 points may be set in this dialog, the other 0 to 50 points are set per monster type in the monster editor.
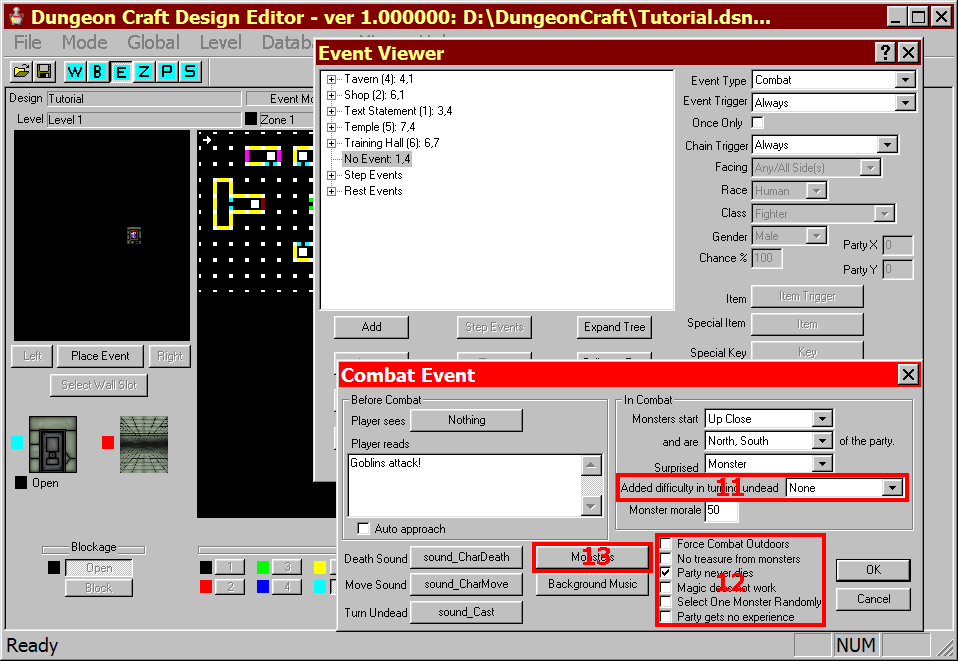
- If you wish to make undead more difficult or impossible to turn, use the dropdown menu, with progressively difficult settings.
- These checkboxes are the miscellaneous, but important options for this combat. By default, none are checked. 'Force Combat Outdoors' determines whether or not the combat is on the indoor or outdoor map; 'No Treasure From Monsters' means the party will not receive any treasure from this combat; 'Party Never Dies' means that the party cannot die in this combat and allows for the option to let the party lose a combat but not the game - since this is a tutorial, I don't want to kill off the party; 'Magic Doesn't Work' controls whether spells will work; 'Select One Monster Randomly' bypasses the monsters added by the designer to choose one monster at random from the monster database; 'Party Gets No Experience' means that no Experience Points (XP) would be gained regardless of the monsters in the combat.
- Clicking this button opens the Monster Selection Dialog.
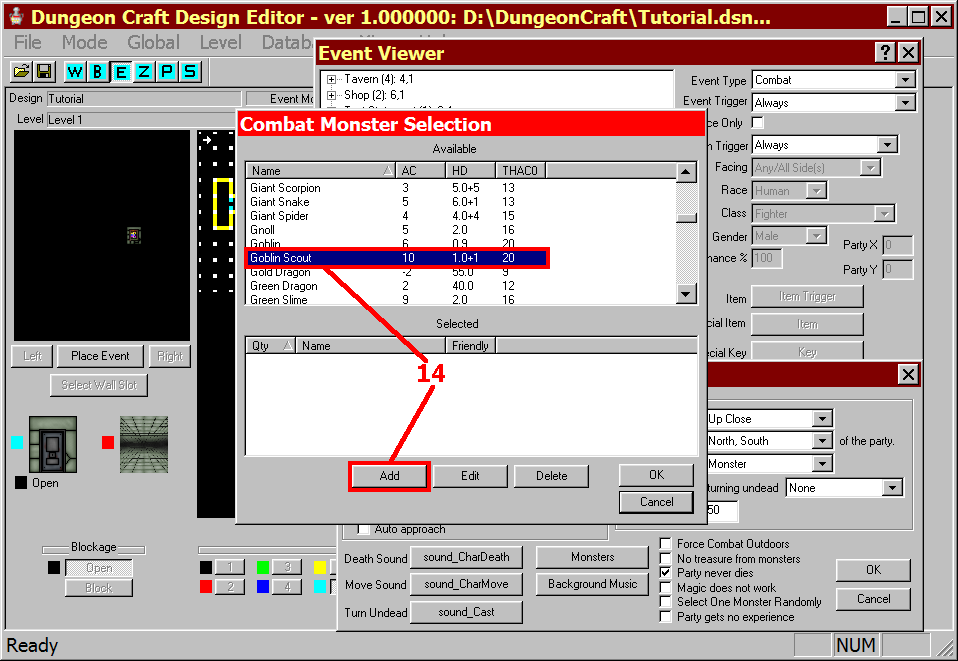
- Locate and highlight the monster you want to use in combat. I selected the Goblin Scouts we created earlier in this tutorial. Click 'Add' to bring up the Monster Properties Dialog
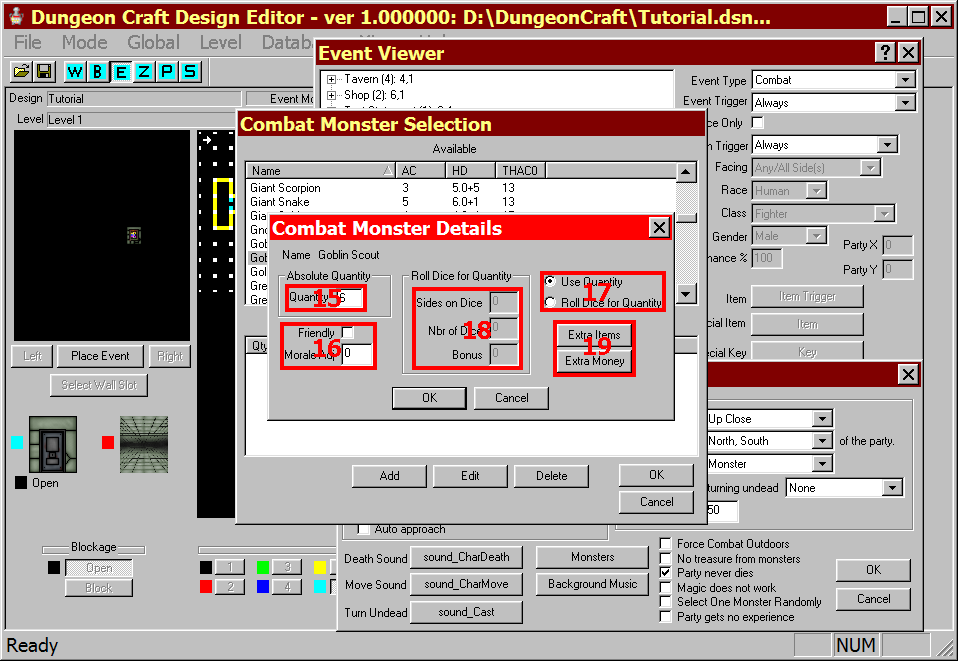
- Enter the number of this type of monster you want the party to face in this combat. I want an even number so that the grouping on either side will be equal - 6.
- Not all monsters need be hostile to the party, if friendly to the party check 'Friendly'. You may also decide that the monster needs a morale adjustment, maybe a little higher to show a particularly brave or loyal monster, or a little lower to show a coward or shrewd opponent.
- By default, "Use Quantity" is selected and what we filled in above, but you may decide that you want a random number of monster to show up, in which case you choose "Rool Dice for Quantity" to activate the options covered in the next description.
- If using a dice roll to determine quantity (see immediately above), this group will be active and allow you to set the parameters for the dice roll - number of sides, number of dice, and a bonus if you desire. For example, if you want 2 to 7 goblins to appear, you would set "Sides on Dice" to '6', "Nbr (Number) of Dice" to '1' and "Bonus" to '1'.
- Some monsters come with supplies - items and or money. But, you may want to give them more for this combat. To do so, choose a button and select the items or money to add. I chose to add the Goblin Knife we created earlier in the tutorial.
- Click "OK" three times and "Close" when you are done.
Combat Walls and Backdrops
Placing the Combat Event
Placing the Combat Event
Monster Selection Dialog
Monster Properties Dialog
Finishing the Small Town
Our tutorial Small Town is playable at this point, but just barely. To flesh it out, we need some more buildings and inhabitants. I also want a way to control the traffic on this level which will be better explained in the next section.
- I added a couple of more buildings to represent homes where townsfolk live - using Wall and Backdrop editors. To add a sense of being to the level, I added Text Statement events in each house reflecting a greeting from the inhabitants.
- I added tree walls all around the town to keep the party from wandering off. Note I did leave a passage in the Southeast corner for the party to come and go through. I also placed outdoor backdrops in all of the empty outdoor spots that the party could get to.
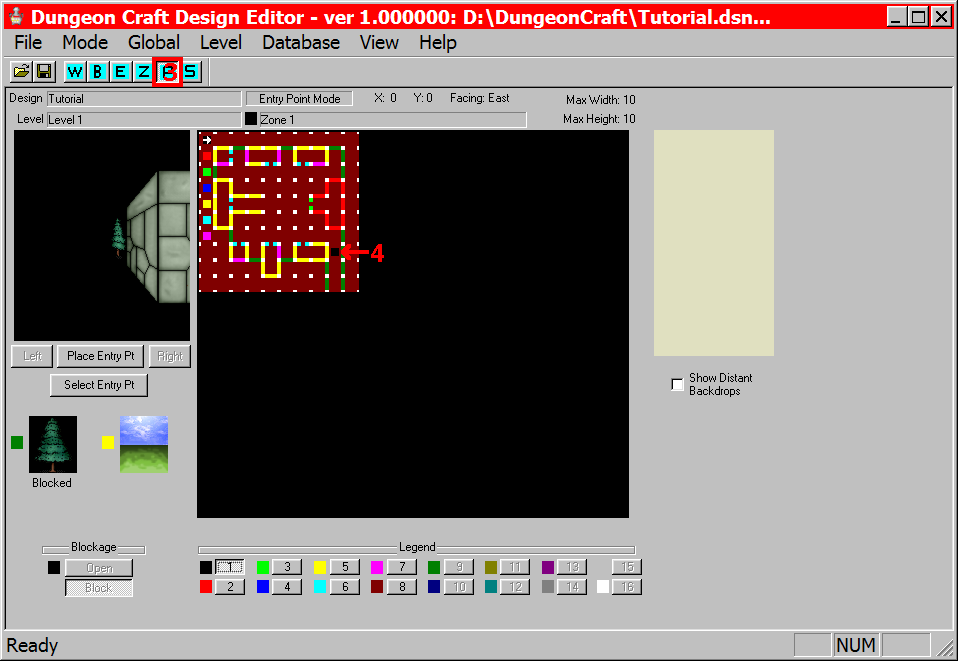
- We need to place an Entry Point for use in the next stages. To do this, we must enter Entry Point Mode, which we can do by clicking on the "P" on the top menu.
- Select entry point 1 from the bottom legend and then click on the square you wish to have your entry point. In our case, the entry point represents where the party will be standing when they return to the town from the overland map level. Place the entry point in the walkway in the Southeast corner, about in the middle.

Finishing Touches
Entry Points Mode
Creating an Overland Level
We want the player to be able to do more than just explore this one small town, we need to create an Overland Level that will represent walking around the lands surrounding the small town as well.
- Select "Level" from the top menu and then "Level List" from the dropdown menu. This opens up the Level Lists Editor.
- To add a level, select an unused level, highlighting it in the list. I've already used Level 1 for the small town, so I chose level 2 to be my overland
- To activate the level, and to make it into an overland level, select "Properties". Note; if you want to edit a level, you would select the level from the list and chose Properties.
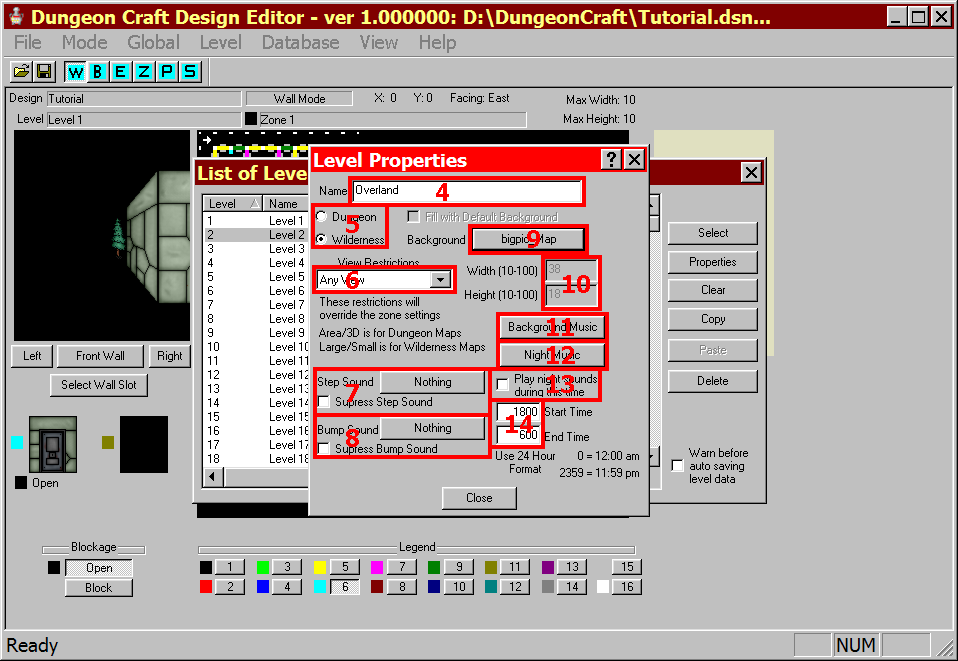
- This is the name of the level, which by default is "Level" and the level number. I wanted it to better represent what I was doing, so I renamed it to "Overland".
- By default, "Dungeon" is checked and that allows us to do the kind of things we did with the small town. But for an overland level, select "Wilderness".
- This dropdown menu sets how the player may view this level: Any View, Area/Large View Only, and 3D/Small View Only. Large and Small apply to overland levels. The large view is the same view as a big pic - the whole top area of the screen, and the small view is the viewport we are used to in 3D mode. I left it set to 'Any View' so that the player can use which she likes best.
- This button allows you to change the sound heard when the party takes a step, or by checking the box, make it so that no sound is heard. I decided to stick with the default setting.
- This button allows you to change the sound heard when the party bumps into something, or by checking the box, make it so that no sound is heard. I decided to stick with the default setting.
- This button is only active when Wilderness is selected (step 5). It is how you choose the map to use for the overland level. The default image, bigpic_Map.png, is selected by default, and I left it this.
- If this were a Dungeon level, these boxes would be active so that we could set the size of the level, but a Wilderness level sets the size based upon the image chosen for the map which in our case will make the level 38x18.
- Use this button to select any background music you would like the party to hear while use the overland level. I chose not to use any.
- This button allows you to select which sounds, if any will play at night, set below. I chose not to use any night sounds.
- If you would like to use the night sounds selected in the previous step, check this box.
- If you are using night sounds, set the start and finish time in these two boxes, respectively. Military time is used to avoid confusion between a.m. and p.m. As I'm not using night sounds, I left the numbers at their defaults.
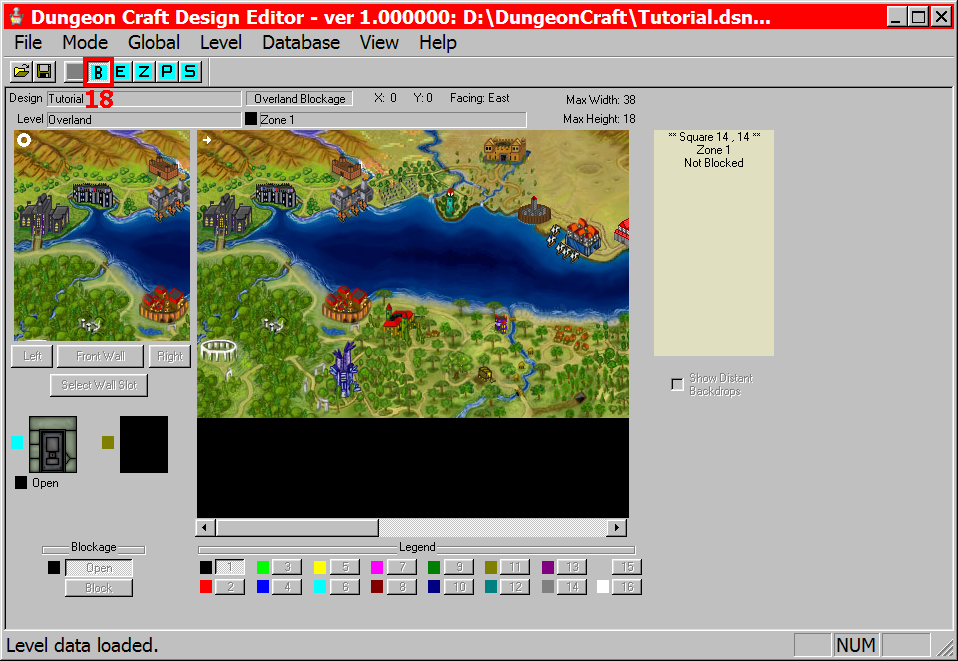
- Take a second to see that the entry for the new level now has updated information, including the name of the level, that it is active and that it is an overland level.
- To switch from working with Level 1 to Overland, choose "Select".
- You may be presented with a "Level Warning" asking you to save the current level before continuing. Choose "Yes".
- Now that the Overland level is loaded, notice that the Wall and Backdrop editors have disappeared from the options, but there is a new option for "Blockage" which uses the same "B" as the Backdrop editor.

Level List Editor
Level Properties

Level List Editor
Overland Level
Placing a Transfer Module Event
Now that we have an overland level for our design, it would be nice if the player could get back to the small town whenever she wants, and leave the small town to get back to the overland level.
- Put the DC editor in Event mode by selecting the "E" in the top menu.
- Select the place where you would like the Transfer Module event to be placed. I think the graphics at coordinates 18,11 look perfect to represent the small twon.
- The event can be placed either in the in the small view or on the larger level area
- I chose Transfer Module from the Event Type list, and note that I left the setting for the Event Trigger to 'Always' since I want the player to go to the small town, whenever she likes.
- Click on 'Add' to bring up the Transfer Module dialog.
- To choose an image to go with this event, select it by pressing this button. I chose not to use an image.
- Place a message or question here. I asked if the party wished to enter the small town.
- These three options determine how the event will work. To have the message entered in the previous box be a question, check this first box for a Yes/No dialog. By my choice of the radial buttons, the event will happen when the player chooses "Yes". You may also wish to have any drow equipment the party is carrying destroyed, but since they will not get any in this design, I leave the box unchecked.
- To determine whether the Transfer Module Event will occur when the party tries to enter the square at 18,11 or when they enter that square, select the appropriate option. I chose to have the event when the party is in the square.
- This text box is for entering any message you wish the party to see after they have transfered. Since there is nothing that springs to mind that I would like to say under that circumstance, I left it blank.
- Click this button to bring up the Teleport Destination dialog.
- Use the arrow keys to select the level you wish to have the party teleport to, the options are all active levels including the level you are currently working on. Because I want the party to go to the small town, I chose Level 1
- This dropdown menu gives the option of selecting one of the 8 entry points for the chosen level or specific coordinates. Because I set the Entry Point to make it easy for me to remember, I selected Entry Point 1.
- Choose one of the four cardinal directions with this dropdown menu. Because the chosen entry point is in the Southeast corner of the level in a North/South running passage, it makes the most sense to have the party facing North.
- If I had chosen to use coordinates instead of an entry point, these boxes would be active and they would be where I entered the x and y coordinates for the chosen level.
- If you would like to have event happen at the teleport destination, check this box. I don't want any events to fire upon arrival, so I unselected it.
- Click "OK" twice and click "Close".
![]()
Placing Transfer Module Event
![]()
Transfer Module Event
![]()
Teleport Desitnation Dialog
Adding to the Overland level
Our tutorial Overland level is not quite playable at this point. To make it playable, we need to keep the player from doing things like walking through the inland sea, which is controlled with blockage. I also want a way to control the traffic on this level which is similar to what I did with Entry Points in the Small Town.
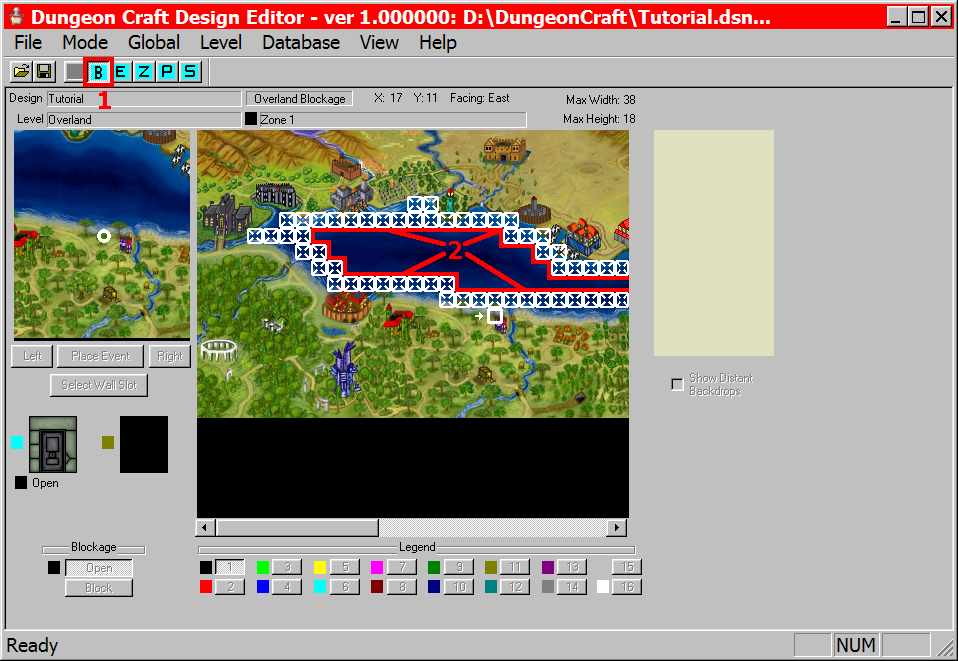
- Swith to Blockage Mode by selecting the "B" from the top menu.
- I added impassible squares all the way around the inland sea to keep the party from walking through it. If you wanted to, you could do this with the mountains, rivers, or anything else you didn't want the party to be able to cross.
- We need to place an Entry Point for use in the next stages. To do this, we must enter Entry Point Mode, which we can do by clicking on the "P" on the top menu.
- Select entry point 1 from the bottom legend and then click on the square you wish to have your entry point. In our case, the entry point represents where the party will be standing when they return to the overland map from the small town, Level 1. Place the entry point at 18,11 which are the coordinates of the Transfer Module Event.
- In preparation for the next feature to be added, I want to "zone" the level. To enter Zone Mode, select "Z" from the top menu
- Choose zone 2 from the legend and select a square to place the zone, which will also be the site of the next event we create, providing a place for the party to rest. I placed one square of zone 2 at 18,15.
- Open the Zone Editor by selecting 'Level' from the top menu and Zone from the list.
- Since the purpose of the zones in this case is to keep the party from resting anywhere except in zone 2, use the arrow keys to select zone 1, the only other zone in use on this level.
- Check the box that reads, "Cant Rest in this zone".
- Leave everything else as is and click "OK".
Blockage Mode
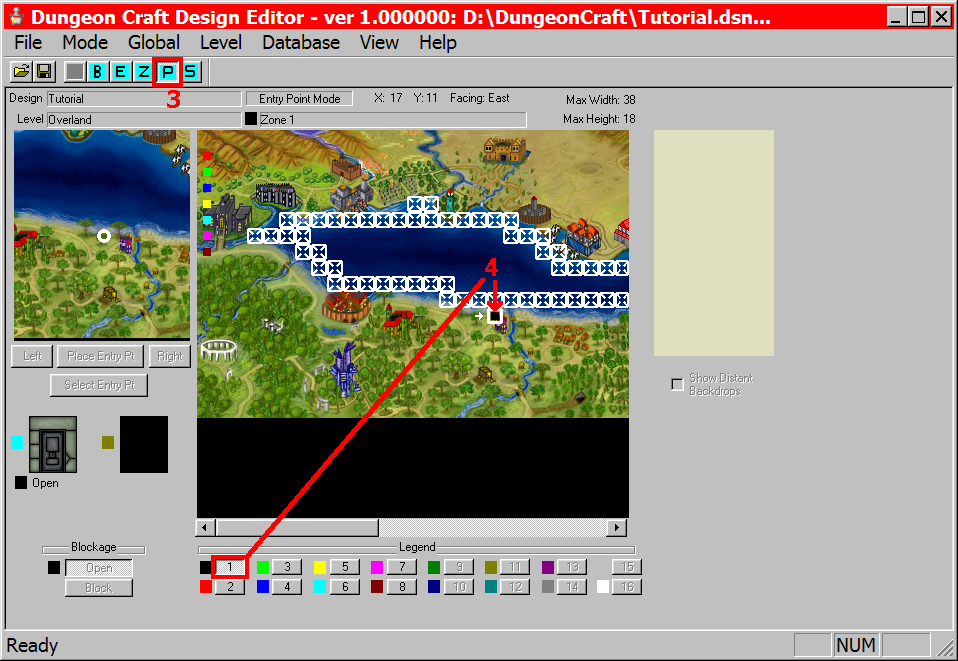
Entry Points Mode
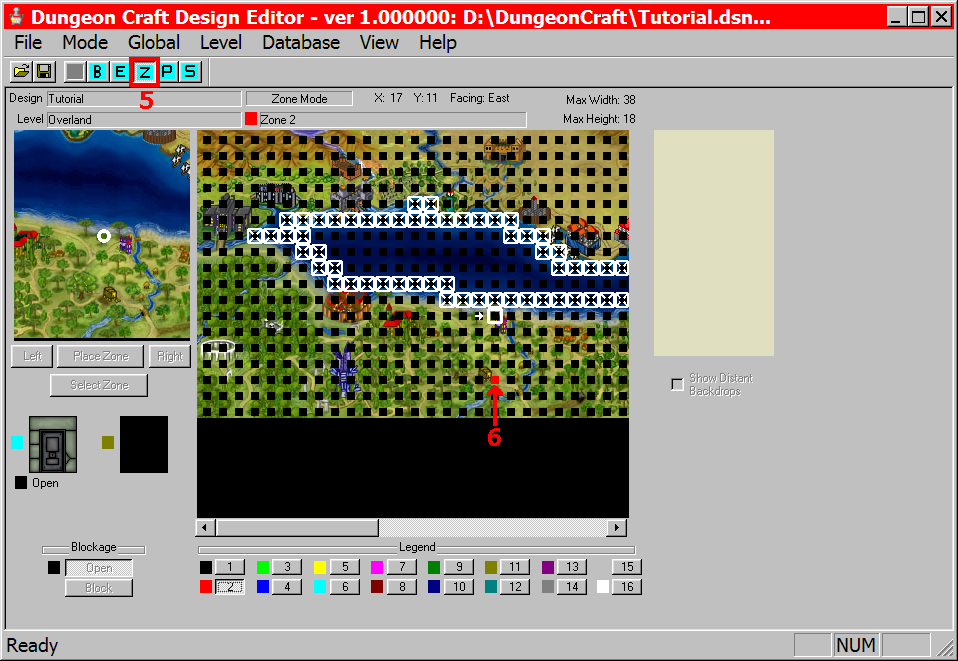
Zone Mode
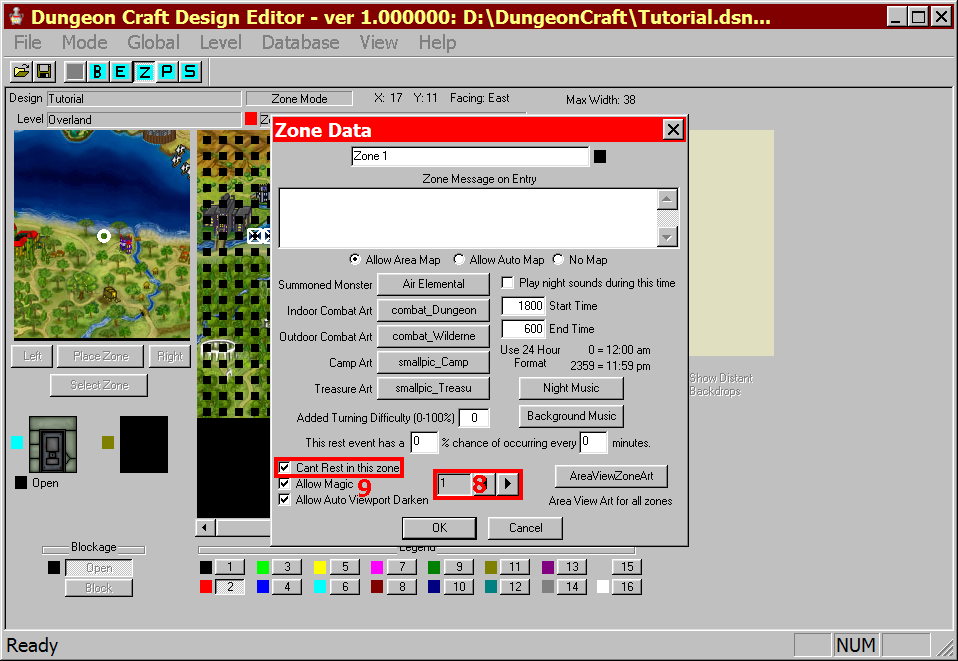
Zone Editor
Creating an Inn
Now that we have made it so that the party cannot rest anywhere on the overland map except in one location, it's time to put an Inn at that place. You will notice that there is not an Inn event. We will make ours using a Who Pays event with a chain to a Camp event.
- To place the Who Pays event, click on the square you wish to hold the event. This will open the Event Editor. The event slot for the chosen square will be highlighted. I placed it at coordinates 18,15.
- From the Event Type dropdown menu, choose Who Pays. Note that I leave the Event Trigger to Always.
- Click "Add" to open the event dialog.
- Choose an image to represent the innkeep or the inn. This image must be a small pic. I selected portrait_NPC_HalflingFemale.png.
- Enter a message for the player to read. This message will display every time the event is activated. I entered a greeting that included the price of the stay at the inn.
- If you wish to make this event impossible select this box, though not for this particular event.
- Choose the cost in either gems, jewelry or coins or in combination. The dropdown menu for money type allows you to choose which type of coin. I set the cost to 2 platinum pieces.
- Enter a message for the player to read if they pay the required cost, such as thanking them for their business.
- This dropdown menu chooses what, if anything, will happen upon successful payment. The options are 'No Action' which does nothing; 'Chain to Event' which creates a chain option for this event in the event editor, 'Teleport' which activates the button beside the menu and allows you to determine a location to teleport the party to; and 'Backup One Step When Done' which moves the party back one square in the direction they just came from. For purposes of creating an inn, select 'Chain to Event'.
- Enter a message for the player to read if they do not pay the required cost. I wrote something inviting the party to come and stay at the inn at a different time.
- This dropdown menu is exactly the same as the one detailed above. For creating the inn, select 'Backup One Step When Done'. Click "OK".
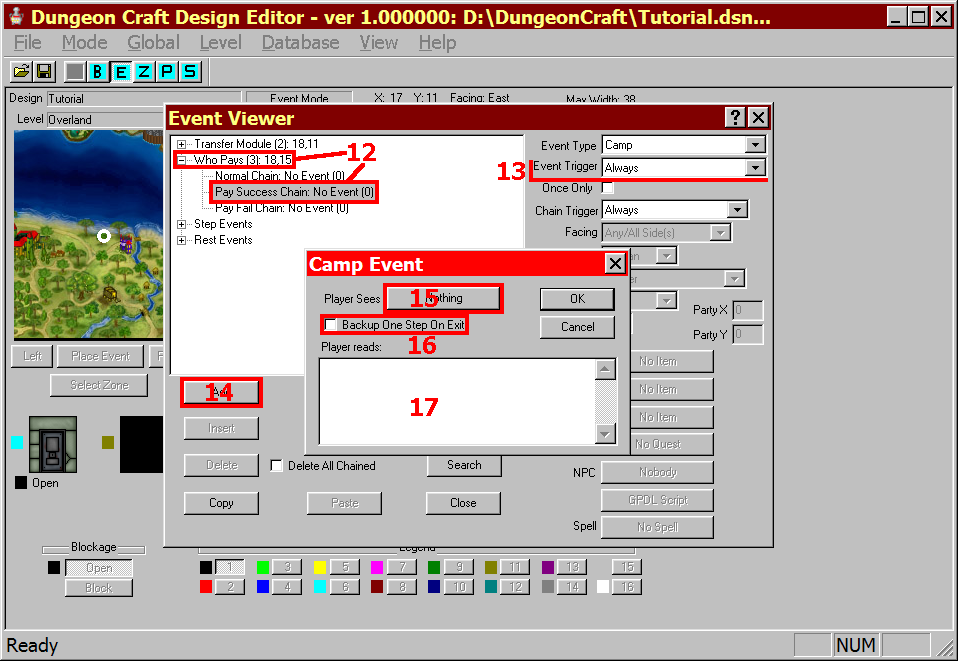
- Click the '+' next to the Who Pays event that was just added, and select Pay Success Chain.
- From the Event Type list, select 'Camp'. The Event Trigger should be set to Always.
- Click "Add" to open the event dialog.
- Use this button to select an image for the player to see, such as the Camp small pic (smallpic_Camp.png).
- Check this box to have the party backup one step when the event is done.
- A message in this text box will be seen every time this event is activated. I added a message briefly describing the camp.
- Click "OK" and "Close".
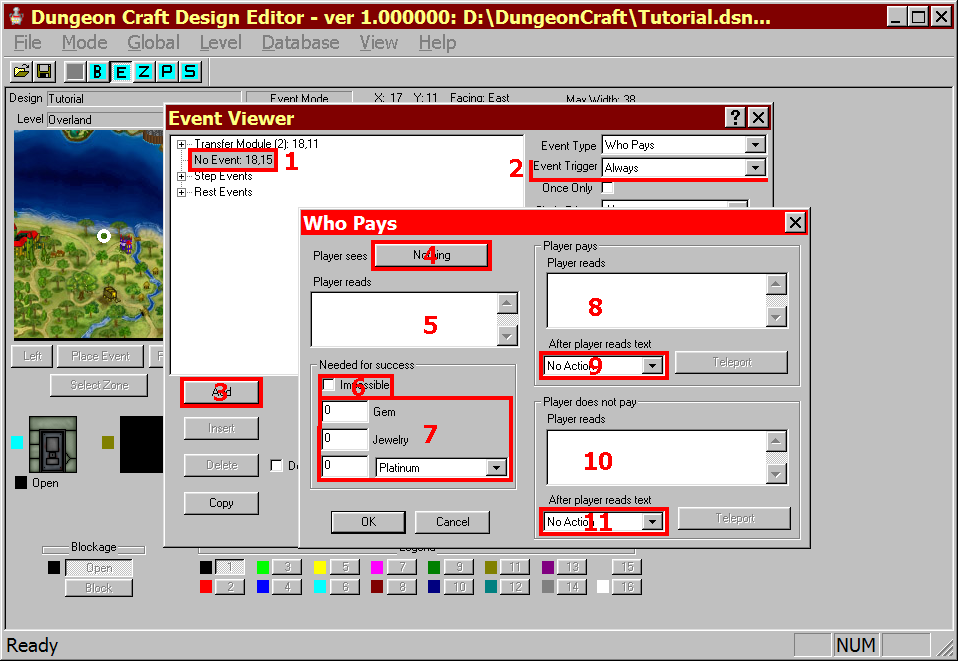
Selecting Who Pays Event
Selecting Who Pays Event
Creating an Encounter Using a Chain Event
Now that we have a place for the party to rest on the Overland level, we need to give them a reason to occasionally need to rest. There is no better way than adding an Encounter with monsters. Instead of placing an event in a particular, we want it to occur under given circumstances anywhere in a given zone - zone 1.
- From the top menu, choose 'Level' and select 'Event Editor'
- Click the + next to Step Events to open the tree and highlight Step Event 1.
- From the Event Type menu, select "Chain".
- From the Event Trigger menu, select "Nighttime". This means that if the condition is met, the 'Chained Event' will be used, else the 'Normal Chain' will be used.
- From the Chain Trigger menu, select "Always". We want the Normal Chain to always happen if the Nighttime condition is not meant.
- Click "Add" to add the Chain event. No dialog will appear.
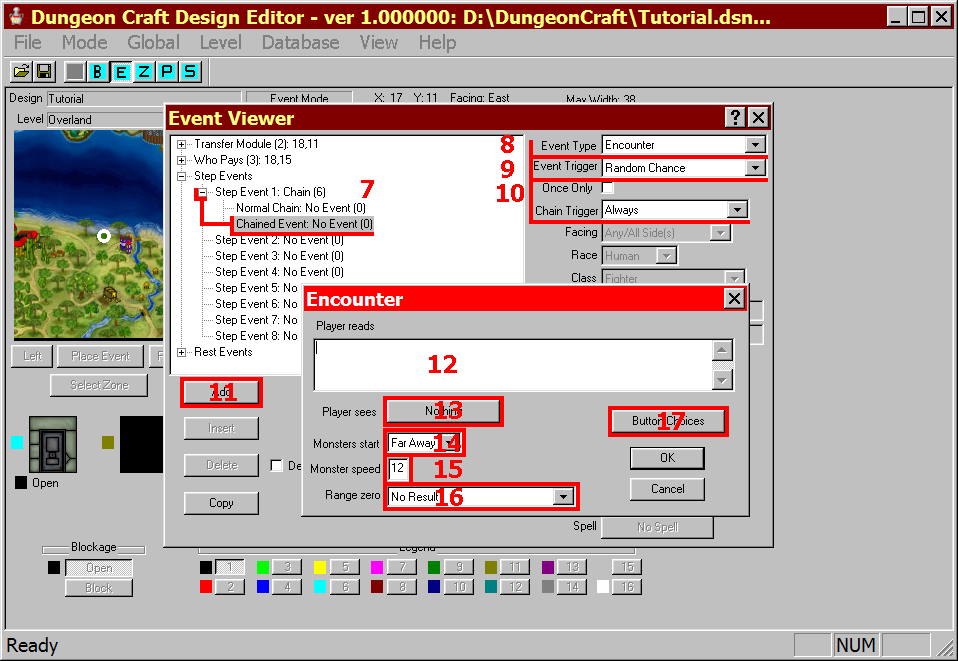
- Click on the + next to the Chain event, and highlight "Chained Event".
- From the Event Type menu, select "Encounter". This event will provide us with more options than a simple combat would.
- From the Event Trigger menu, select "Random Chance". We don't want the encounter to happen every time.
- Leave the Chain Trigger menu set to "Always".
- Click "Add".
- This is the message the player will read each time the encoutner occurs. I wrote a short descriptive statement, "The party has encountered a band of goblins."
- Click the button to choose the image to display. This event allows sprites, small pics and big pics. While this event makes particularly good use of sprites, advancing through the frames depending on choices made by the player, the sprites do not look good with the map as the background, so choose a small pic or big pic for overland encounters. I am using smallpic_Goblin.png.
- This dropdown menu is for the distance from the party at the start of the encounter. I chose "Far Away" so that the party would have more chances to get out of the combat.
- Select the speed of the mosnters. This number effects several options discussed later. I left the value at the default '12'.
- From the Range Zero dropdown menu, select what you want to automatically occur. I selected "No Result" as I want the party to have the choice to get out of combat at any time; other options are "Combat, Slow Party Surprised" (if party movement lower than monster speed), "Combat, Slow Monster Surprised" (if party movement higher than monster speed), "Talk", "Escape If Fast Party, Else Combat".
- Click this button to get to the Encounter Button dialog.
- For Button 1, set the label to "Fight" and the Effect of Button to "Combat, No Surprise". Make sure the Present box is checked, the Allow Up Close box is checked (it is by default) and the Only Allow When Up Close is not checked (it is not by default) as we want the party to be able to initiate combat at any point.
- For Button 2, set the label to "Talk" and the Effect of Button to "Talk". Make sure the Present box is checked, the Allow Up Close box is checked (it is by default) and the Only Allow When Up Close is not checked (it is not by default) as we want the party to be able to parlay at any time.
- For Button 3, set the label to "Run" and the Effect of Button to "Escape If Fast Party, Else Combat". Make sure the Present box is checked, the Allow Up Close box is checked (it is by default) and the Only Allow When Up Close is not checked (it is not by default) as we want the party to be able to be able to try and flee at any time.
- For Button 4, set the label to "Wait" and the Effect of Button to "Decrease Range". Make sure the Present box is checked, uncheck the Allow Up Close box (it is checked by default) and the Only Allow When Up Close is not checked (it is not by default).
- Click "OK" twice.
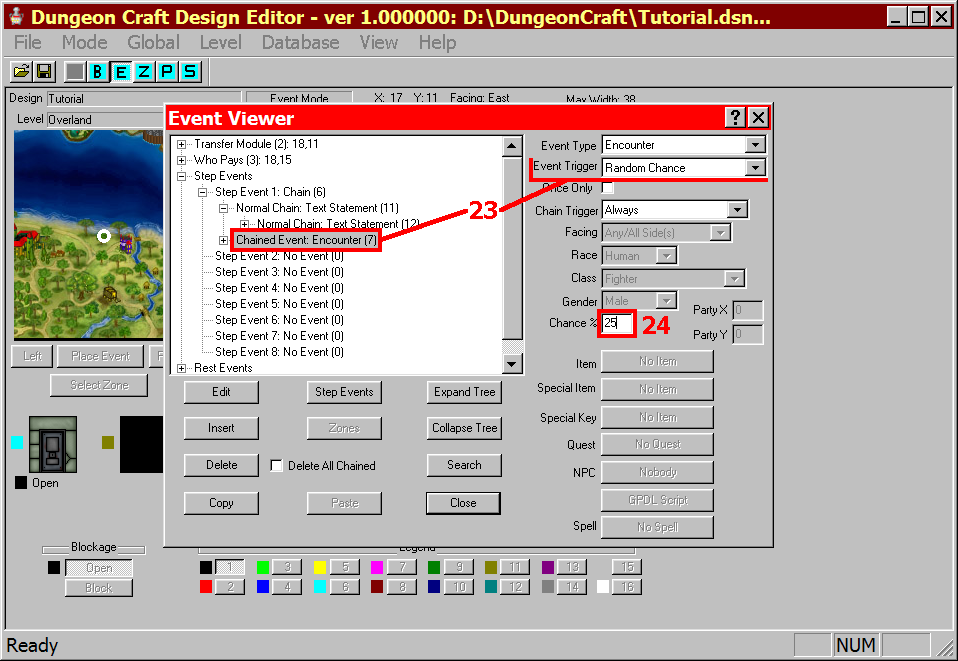
- Make sure that the Encounter event is highlighted and that the Event Trigger is set to "Random Chance".
- Now that the event is placed, the Chance % box is active. In this box enter 25. This means that during the Nighttime (set with Chain), this event has a 25% chance of occurring.
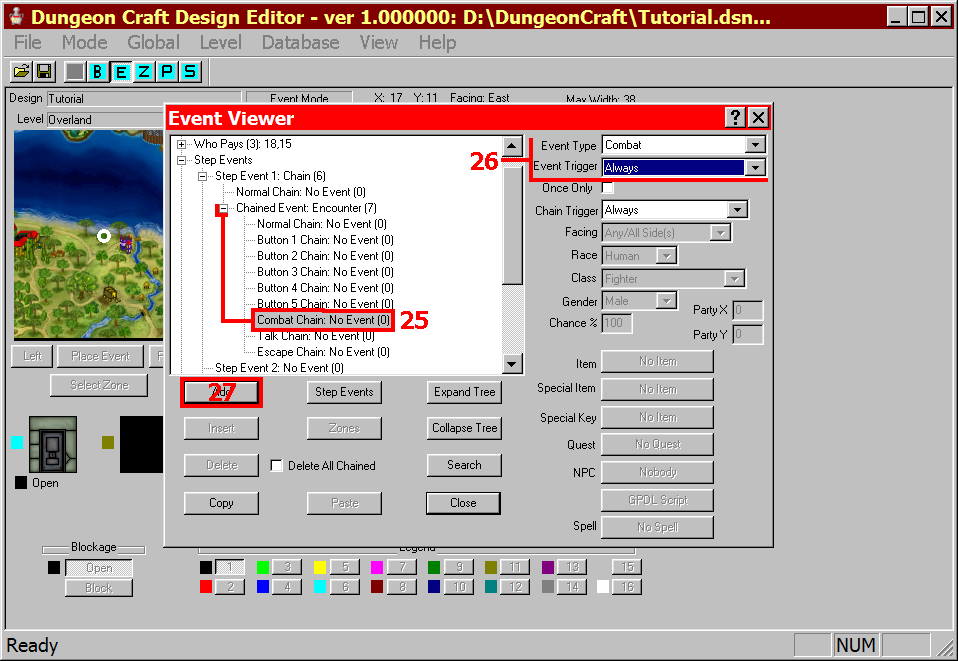
- Click the + next to Chained Encounter and select "Combat". This will be the combat that we chose with the options for Buttons 1 and 3.
- Select an Event Type of "Combat" and leave the Event Trigger set to "Always".
- Click "Add".
- Select goblin from the list and "Add".
- Select "Roll Dice for Quantity". We want this event to be fresh each time it occurs.
- We want each combat to be against 3 to 9 goblins, set Sides on Dice to "3" and set Nbr of Dice to "3".
- Click "OK" three times.
- Select "Talk" from the options under Chained Encounter. This corresponds directly to our 'Talk' option - button 2.
- Select "Text Statement" from the Event Type menu, and make sure that Event Trigger is set to "Always".
- Click "Add". If you need help with the Text Statement event, please refer to earlier in this document.
- Select "Escape" from the options under Chained Encounter. This corresponds directly to our 'Run' option - button 3.
- Select "Text Statement" from the Event Type menu, and make sure that Event Trigger is set to "Always".
- Click "Add". If you need help with the Text Statement event, please refer to earlier in this document.
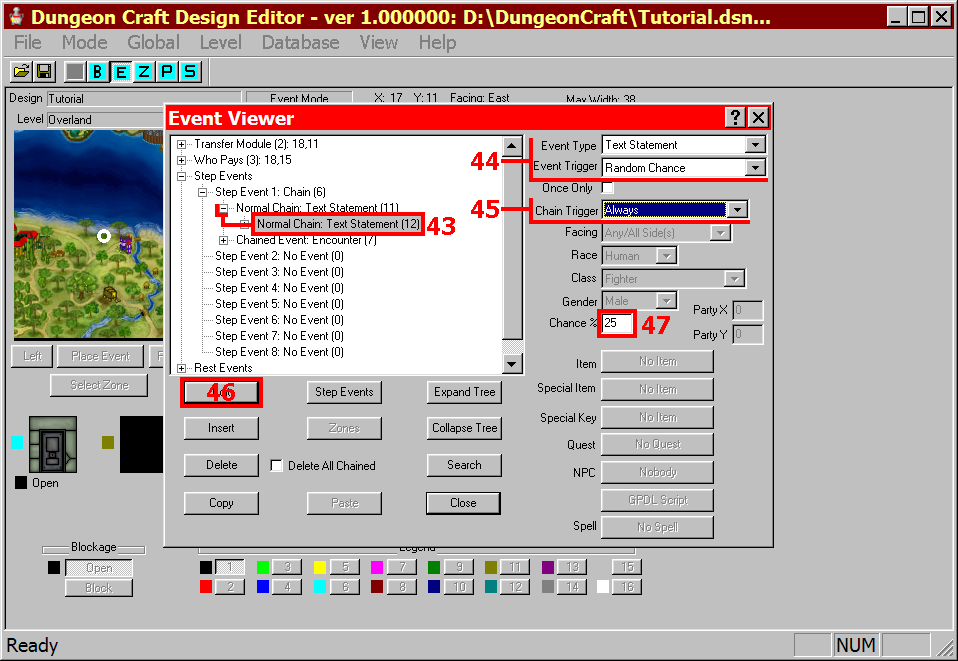
- Select the "Normal Chain" option under Chain. These events will only occur during the Daytime, becuase the other chain is occurring at Nighttime.
- Choose "Text Statement" from the Event Type menu, and for the Event Trigger choose "Random Chance" just like we did for the Encounter event for exactly the same reasons. We dodn't want this event to occur every time it could.
- From the Chain Trigger menu select "If Event does not happen". We will be chaining another event to this one so that there is some variety in what the party reads, but we don't want the second event to occur if the first one does.
- Click "Add". If you need help with the Text Statement event, please refer to earlier in this document. I wrote something mundane and non-threatening to reflect what a nice place the party is adventuring in.
- After clicking "OK" and returning back to the Event Editor, the Chance % box is now active, in that box put "25".
- Click the + next to the Text Statement event we just placed. Select Normal Chain under it. This event will only occur during the Daytime if the previous Text Statement did not.
- Choose "Text Statement" from the Event Type menu, and for the Event Trigger choose "Random Chance" just like we did for the Encounter event for exactly the same reasons. We dodn't want this event to occur every time it could.
- Leave "Always" as the choice for the Chain Trigger, as we will not include any more options in this chain. If you wanted to add more options, set it as above to "If Event does not happen".
- Click "Add". If you need help with the Text Statement event, please refer to earlier in this document. As before I wrote something that would not indicate to the party that they have anything to worry about.
- After clicking "OK" and returning back to the Event Editor, the Chance % box is now active, in that box put "25".
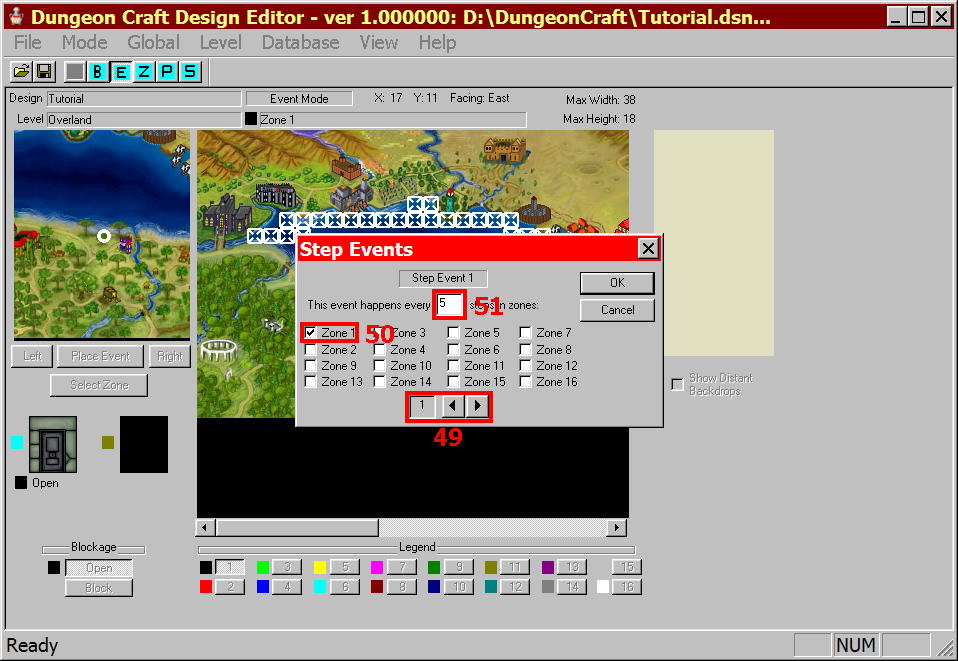
- Now that we have the events in place, we want to tell DC when to use the chain. Click on 'Level' on the top menu and choose "Step Events".
- Use the arrows to select the Step Event chain. Number 1 is already chosen for us by default.
- Select which zones will effect this event. Check next to zone 1 only as we don't ever want the party disturbed while they are resting at the inn.
- This number determines how many steps occur before the Step Event 1 chain is activated. In our case we want the number to be "5". This means that every 5 steps, there is a 25% chance at Nighttime that an encounter will occur and during the Daytime a Text Statement will occur.
- Click "OK".

Selecting Chain Event
Selecting Encounter Event

Encounter Button Dialog
Encounter Event Trigger
Combat Event
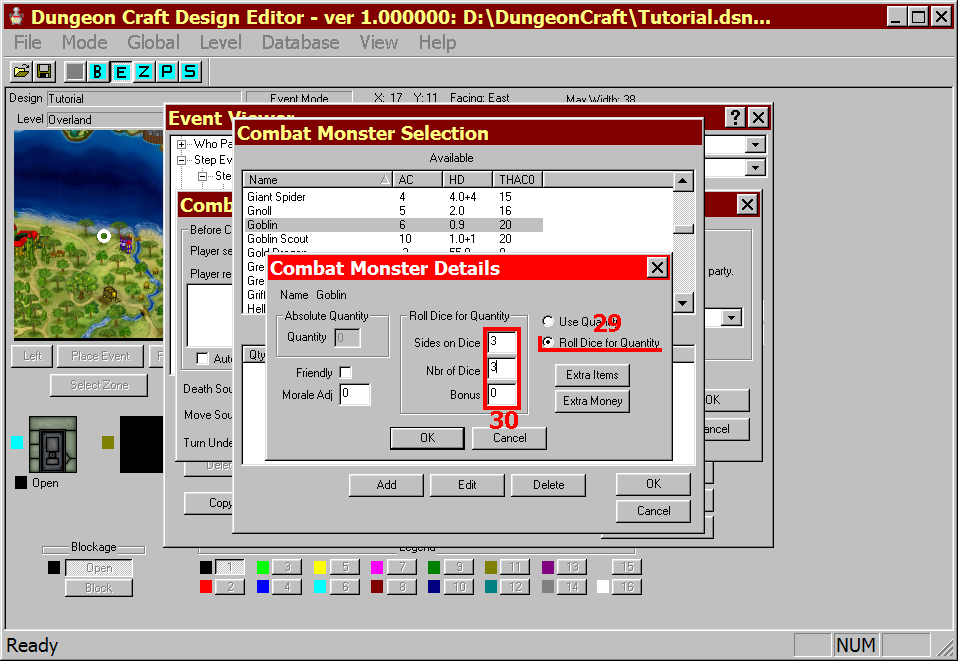
Monster Details
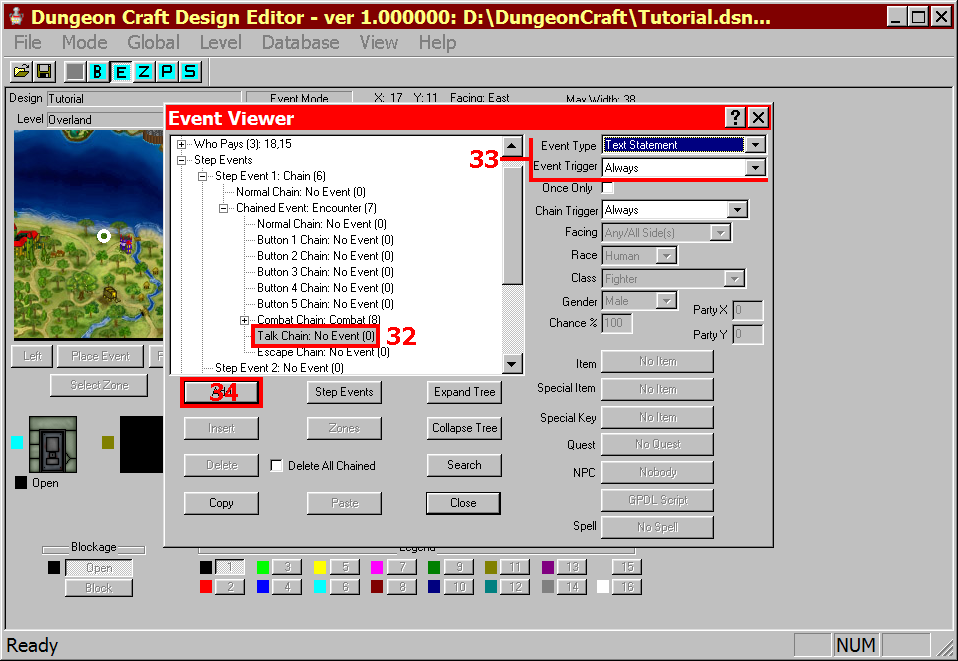
Talk Event
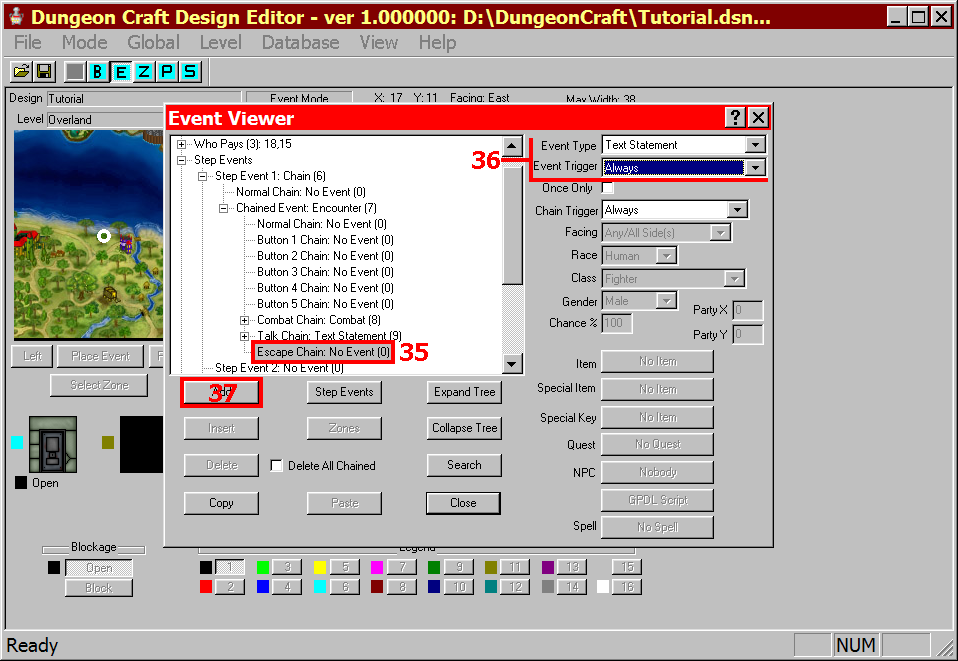
Escape Event
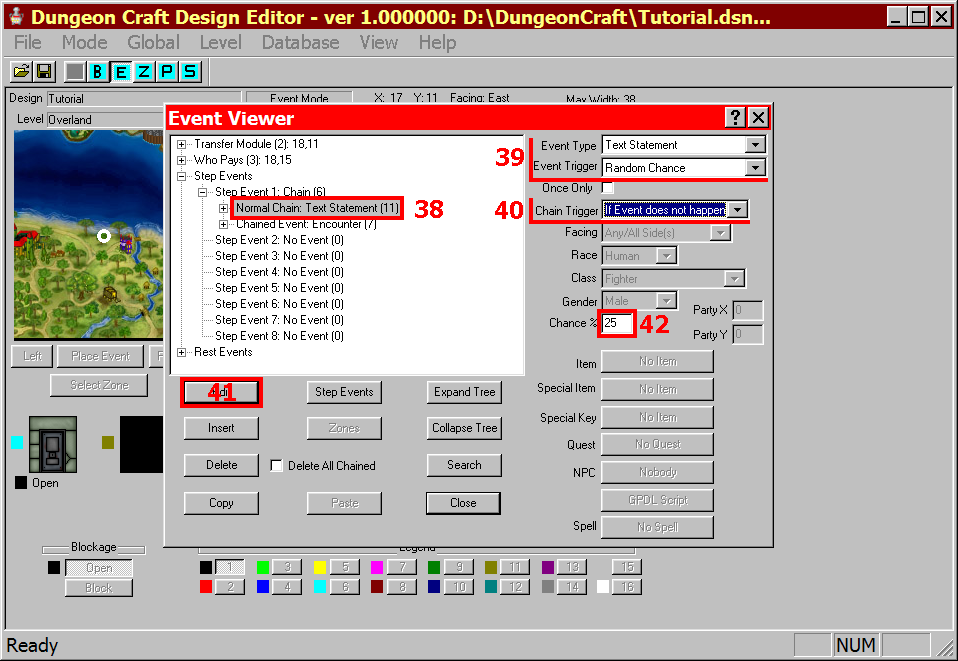
Text Statement Event
Text Statement Event
Step Event Editor
Adding a Quest
Quests are a staple of fantasy role playing games, and DC may use quests to function exactly like this type of quest, for example being tasked by the High King to find the Holy Grail. But DC can also use quests to track events that occur to be used by other events to represents all kinds of things, for example the party gains another quest stage every time they fight goblins, and after they have reached the 10th stage, other events could use this information to determine the party is famous. So, this is what we will do.
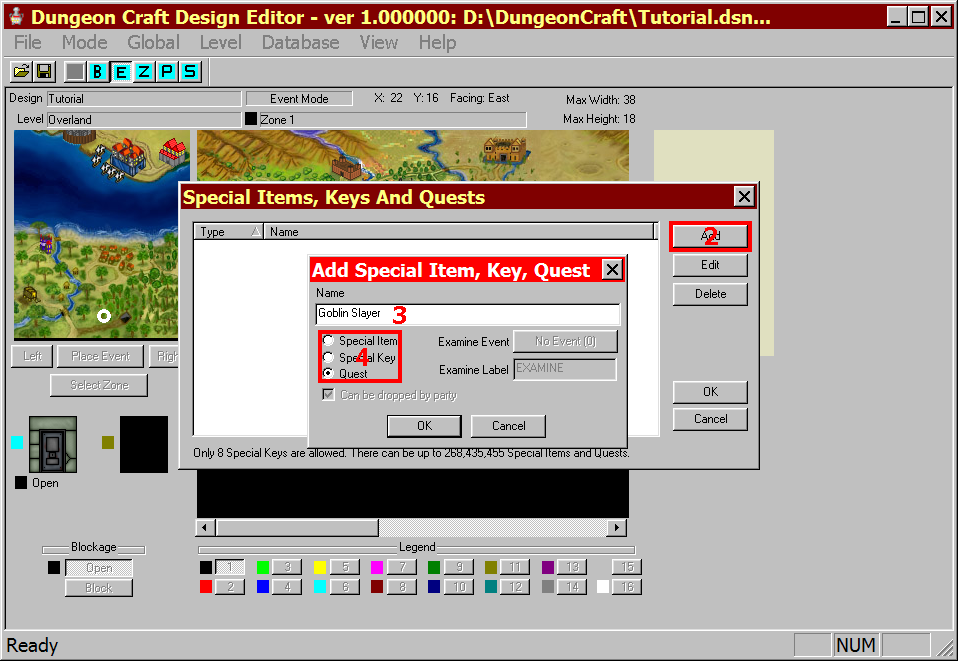
- From 'Global Settings' choose "Items, Keys, Quests..." to open the editor.
- Select "Add".
- Name the quest something appropriate, I called it "Goblin Slayer".
- Choose "Quest" from the three options.
- Click "OK" twice.
- Open the Event Editor and click the + next to Step Events, again for Step Event 1, again for Chained Event Encounter, and again for Combat. Select "Normal Chain".
- From the Event Type menu, choose "Quest Stage". This is how we will give the quest to the party. Leave the Event Trigger selection as "Always".
- Set the Chain Trigger menu option to "If Event does not happen". While the event is set to "Always" happen, it will only happen once because of the nature of the event.
- Click "Add".
- This is a behind the scenes kind of quest, so we do not want to use any images with it.
- Leave the text box blank for the same reason we did not add an image.
- Click the button to select "Goblin Slayer" from the list of available quests.
- On the Accept menu, choose "Automatic (No Question Asked)". This is in keeping wiht our goal for this quest.
- Set the Stage to "1". This is what the number should be for us to assign a quest with this event.
- Click "OK".
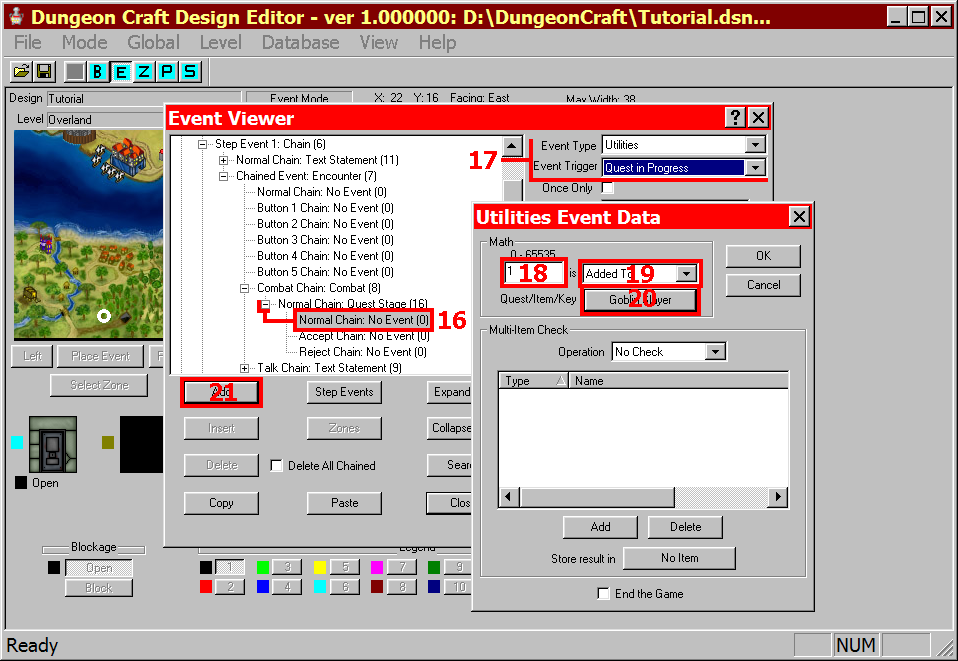
- Click the + next to the Quest Stage event we just placed and select "Normal Chain".
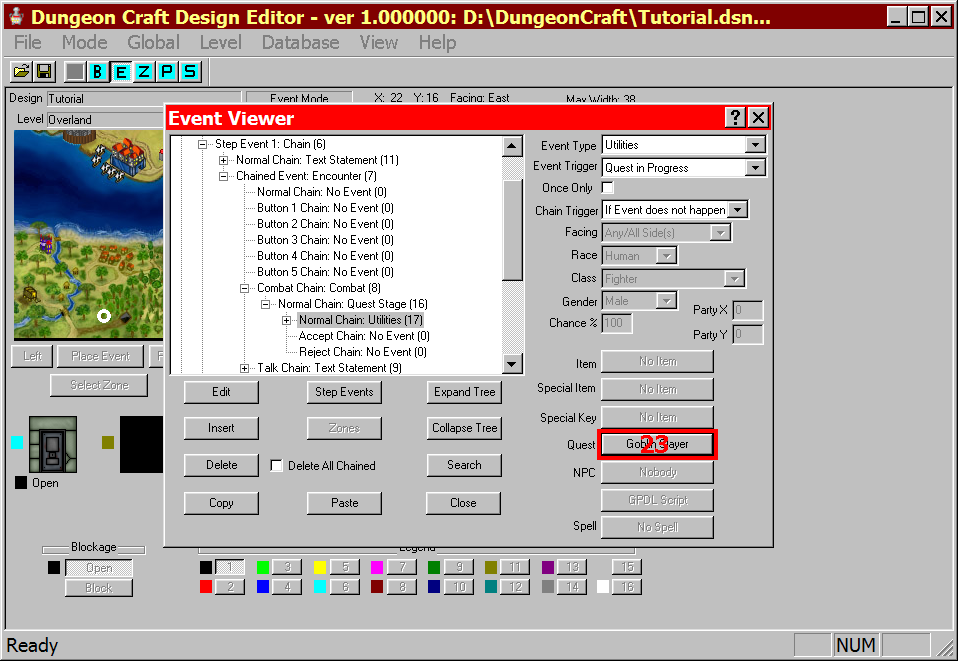
- From the Event Type menu, choose "Utilities". Quest Stage is good for starting a quest and recognizing if a quest is at a certain stage, but this event can 'increment quests. From the Event Trigger menu, choose "Quest in Progress". We'll set the Quest in Progress in a later step.
- Click "Add". This brings up the Utilities Event Data Dialog.
- Place a 1 in the first box. This number will increase our quest by one each time.
- From the Action menu, choose "Added To".
- Select the name of the quest - in this case Goblin Slayer.
- Click "OK"
- After the Utilities event has been added, we can select "Goblin Slayer" by pressing the 'Quest' button and choosing it from a list of available quests.
- Click "Close".
Items, Keys, Quests Editor

Quest Stage Event
Utilities Event
Utilities Event
Finishing Touches
The overland level is now finished for the purposes of this tutorial. There are just a couple of things left to do in the small town - Level 1.
- Select 'Level' from the top menu and choose "Level List".
- From the Level List, select "Level 1" and click "Select". If prompted to save current level before continuing, select "Yes".
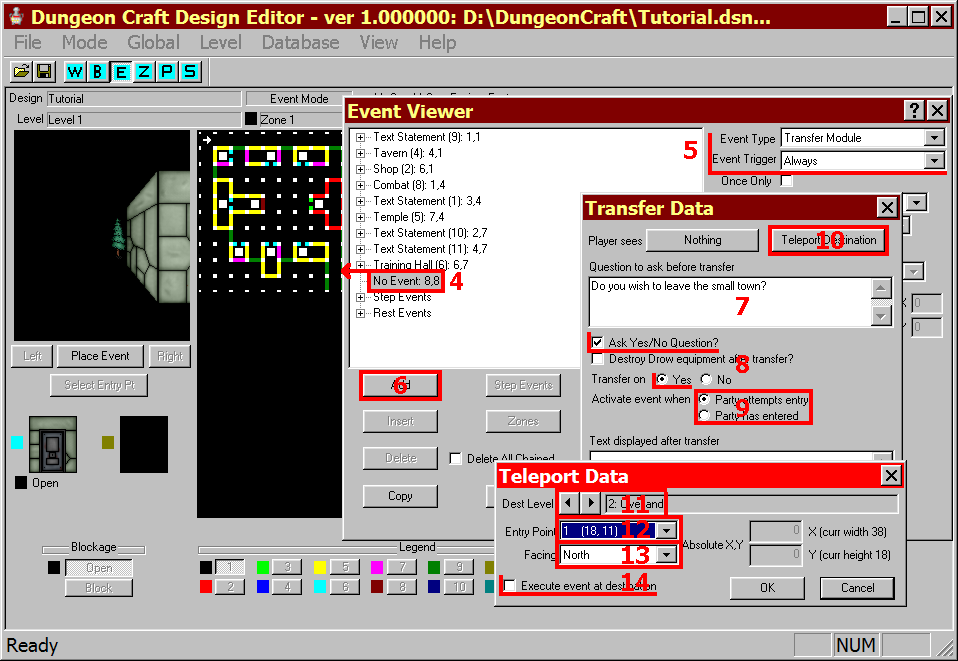
- We need to add a Transfer Module event to connect the small town to the overland map. Select "E" from the top menu to enter Event Mode.
- Select the square at 8,8. We want the Transfer Module event to be on the edge of town.
- When the Event Editor is opne, select "Transfer Module" from the Event Type list and leave teh Chain Trigger set to "Always".
- Click "Add".
- In the text box, write a question asking the party if they wish to leave the small town.
- Leave the "Ask Yes/No Question" box checked and Transfer On set to "Yes".
- Select "Party Attempts Entry" for the activation setting. You will see why in the next steps.
- Use the arrow keys to select level 2 "Overland".
- From the Entry Point menu, select "1".
- From the Facing menu, select a direction. I left it at the default "North".
- Uncheck the box to "Execute event at destination", else the party will be asked to return to the small town as soon as they have left.
- Click "OK" twice.
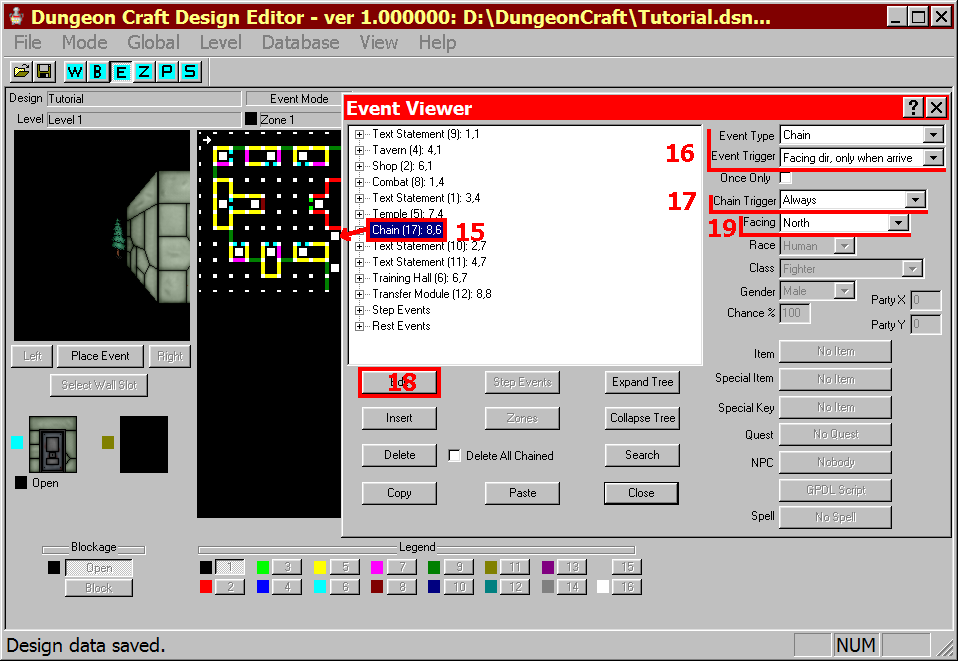
- Select a place for the Chain to be placed. This is the spot where a townsperson will recognize the party once they are famous adventurers as determined by the quest we added earlier.
- From the Event Type menu, select "Chain" and from the Event Trigger menu, select "Facing dir, only when arrive". We only want the party to be noticed as they are coming back into town.
- Leave the Chain Trigger set to "Always". We want them to be recognized every time they come into town.
- Click "Add".
- The 'Facing' box will now be active, select "North" from the dropdown menu.
- Click the + next to the Chain event we just placed and select the Chained Event.
- From the Event Type menu, select "Text Statement" and from the Event Trigger menu, select "Execute GPDL Function". This will be how we check the quest to see if the party has achieved enough victories over the goblins to have become famous.
- Click "Add". In the Text Statement dialog choose a portrait to represent the townsperson, I chose "portrait_NPCGuard.png", and write a simple message, such as "Hey look! It's the goblin slayers!" Click "OK".
- Click the now active "GPDL Script" button. This will open the Script Editor. Enter the following script:
$IF ($SET_QUEST("Goblin Slayer","+0") ># 10){$RETURN 1;};
This script looks at the quest "Goblin Slayer" and if it has a value greater than 10 (11 stages or more) then it will return a 1, which means true. When the trigger returns true, the event happens. - Click "OK" and "Close".
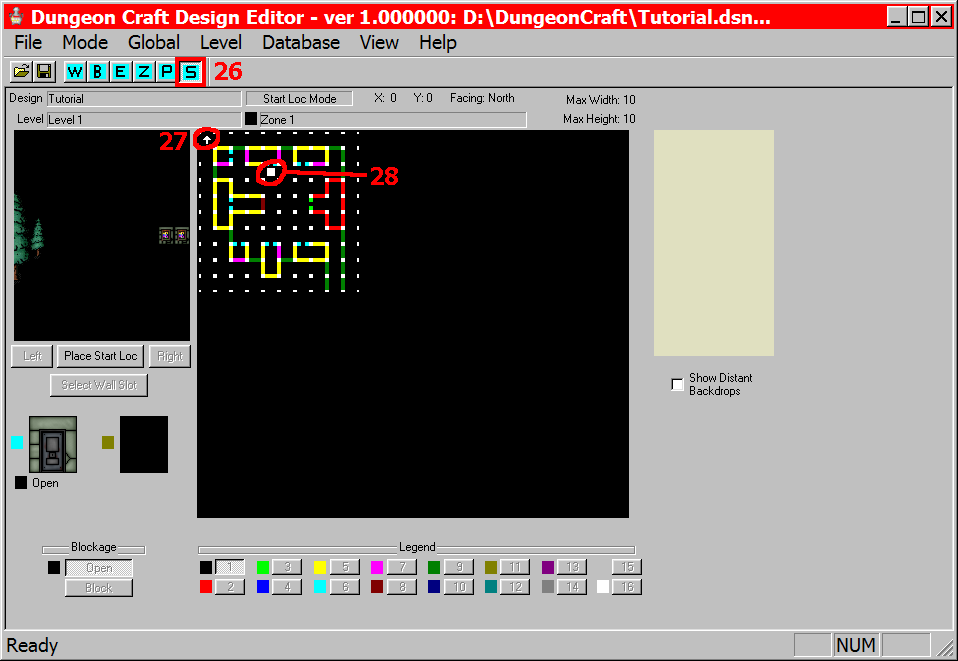
- Now that all events, walls and backdrops, zones and entry points are in place, it's time to pick the spot for the design to start when the player chooses "Begin Adventuring".
- Put the editor in Starting Location Mode by clicking on the "S" on the top menu.
- Turn the arrow on the map to face the direction you want the party to face when they start - you need not move the arrow to the spot unless you want to.
- Click on the square you've chosen. I selected 4,2 facing North - right in front of the tavern door.
- You may decide that the player needs a brief explanation to provide motivation or backstory or something else. If that is the case (and it probably will be in your designs) you may want to place one or more Text Statement events at the starting location. If you do, make sure the "Once Only" box is checked, else the player will see those events every time they enter that square.
Transfer Module Event
Chain Event

Text Statement Event
Starting Location Mode
Save your work. Congratulations, you've just finished your first design in Dungeon Craft. I recommend taking a couple of minutes to play through the design - you can use the Super Spud test character and start from the location of the arrow, by pressing ctrl + T (or selecting Global -> Test Saved Design -> From Current Position); or you can test from the start by using ctrl + D (Global -> Test Save Design -> From Start).