Zone Editor
The Zone Editor is opened from the top menu 'Level' -> 'Zones' or by pressing “Z” on the editor toolbar.
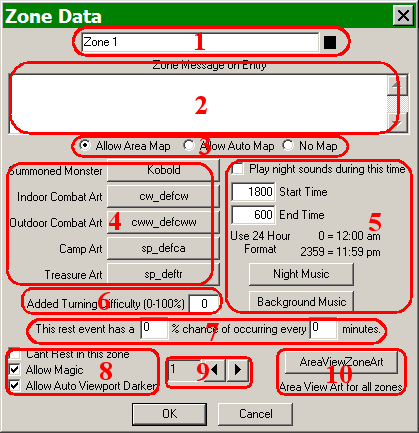
- This is the name of the zone. The designer may rename it to anything she wishes.
- If the designer wishes a message to appear to the player when they are in this zone, it is typed in here. All methods which may be used to modify the font in a Text Statement event (see below) may be used in this text box. Note, any message here will appear upon entering each square of this zone.
- The radial buttons offer one of three choices for how the player map will appear in Area View (see above).
- These buttons allow the designer to determine the default art for this zone, as well as the summoned monster (may be any one from the Monster Database).
- If the designer wishes to use music for this zone other than that set for the level, it is defined here. The time that it occurs is also set here.
- If the designer wishes to make Turning Undead (in combat) more difficult, this is where she determines the amount by which it is changed, expressed as a percentage.
- If the party is allowed to rest in this level (see #8 below), this section determines the percentage chance of the rest being interrupted, and how often the engine should check, expressed in minutes.
- These checkboxes determine what the player is allowed to do in this zone and also if Auto-darkening is allowed.
- The arrow buttons allow the designer to move sequentially forward and backward through the various zones.
- This button allows the designer to choose specific Area View Zone art for this zone.